
In moments of crisis, knowing how to respond can make all the difference. First aid is a vital skill that empowers anyone to step in and help during emergencies, whether it’s a minor scrape or a more serious situation. Imagine being at a picnic when someone accidentally cuts their hand on a sharp object. The ability to calmly handle that injury could sidestep infection and promote quick healing. This guide is designed to give you practical, step-by-step instructions on basic first aid skills, from managing simple wounds to performing lifesaving techniques like CPR. By gearing up with this knowledge, you’ll not only enhance your own confidence but also help create a safer community for everyone around you.
The Basic First Aid Skills: Step-by-Step Guide outlines critical skills such as checking for responsiveness, performing CPR, and managing bleeding. It provides detailed instructions on assessing the scene for safety, obtaining consent, and taking appropriate action based on the individual’s condition, ensuring you are prepared to respond effectively during emergencies.

Essential First Aid Skills Everyone Should Know
The foundation of successful first aid hinges on a few key skills that everyone should be familiar with. One fundamental skill is checking for safety. Before rushing in to assist someone who appears injured, take a moment to evaluate the environment for potential dangers.
Is there a fire nearby? Are electrical wires exposed? Could the structure be unstable? Your safety must come first; you cannot help anyone if you become a victim yourself.
Assessing Responsiveness
Once you’ve ensured the scene is safe, it’s time to assess the person’s responsiveness using the shout-tap-shout technique. This simple approach involves shouting loudly to capture their attention, gently tapping their shoulder, and shouting again if there’s no initial response. During this phase, you’re not only gauging their awareness but also determining whether they require immediate medical intervention.
If they don’t respond and aren’t breathing, it’s vital to call emergency services right away and start CPR.
Effective communication is essential; remain calm and clear in your instructions when informing bystanders to call for help.
Using the Recovery Position
If the person is unresponsive but breathing, place them in the recovery position. This maneuver helps keep someone’s airway open while reducing the risk of choking if they vomit or have difficulty breathing.
To execute this correctly, gently roll them onto their side, ensuring that their head is tilted back slightly to maintain an open airway. Bend their upper knee at a right angle to stabilize them in place. Knowing how to do this properly can save someone’s life until professional help arrives.
These steps go beyond mere actions; they empower individuals with the knowledge necessary to make a difference during emergencies—promoting confidence and decisiveness when every second counts.
Key Recommendations for Effective First Aid
As you equip yourself with these essential skills, consider signing up for comprehensive courses certified by reputable providers like the American Red Cross. Not only will such courses familiarize you with current best practices, but you’ll also receive valuable two-year certification.
Additionally, having a well-stocked first aid kit readily available at home or in your car can make all the difference during unexpected situations. Don’t underestimate the impact of being prepared; it can transform ordinary bystanders into lifesavers.
Understanding these fundamental first aid skills transforms fear and confusion into confidence and action during emergencies. The preparedness gained through education and practice allows anyone—whether seasoned or new—to respond effectively when lives are at stake.
With these essential skills under your belt, let’s now focus on specific techniques that can address common injuries and ensure effective treatment in critical moments.
Treating Cuts, Scrapes, and Bruises
Minor injuries like cuts, scrapes, and bruises are more than just skin-deep; they require careful attention to ensure proper healing and prevent complications. Each step in treatment is essential for ensuring that the area remains clean and protected, thereby reducing the risk of infection and promoting quicker recovery.
Cleaning Cuts and Scrapes
The first step in treating a cut or scrape is crucial: rinse the wound thoroughly with clean water to wash away any dirt or debris. It may be tempting to reach for antiseptics like alcohol or hydrogen peroxide, but these can damage sensitive tissues and actually prolong the healing process. Sticking with good old soap and water is your best bet—just be sure to apply it around the wound rather than directly in it. Gentle cleaning will help avoid further irritation while still removing contaminants.
Tip: If you’re dealing with a stubborn piece of dirt lodged in a scrape, use a soft cloth or sterile tweezers to gently dislodge it after rinsing.
Covering and Protecting
After cleaning the wound, it’s time to protect it. Apply a thin layer of antibiotic ointment—like Neosporin—to create a barrier against potential infections. Ensure the wound is completely clean before applying. Cover it with a sterile bandage or adhesive strip, which keeps dirt out and helps maintain moisture for optimal healing.
The right coverage can significantly influence how quickly a wound heals, so it’s important to change dressings regularly—ideally once every day or anytime the bandage becomes wet or dirty.
Managing Bruises
Bruises, while often merely cosmetic, can be quite painful and need attention too. Begin by applying an ice pack wrapped in a cloth directly over the bruise for about 15-20 minutes at a time. This reduces swelling and alleviates pain, making it an essential remedy for your bruise management toolkit. For optimal results, repeat this process several times throughout the day during the first 48 hours following injury.
Personal Insight: In my experience with treating bruises, pairing ice application with gentle elevation of the affected limb helps further decrease swelling—a technique that really makes a difference.
Learning to handle these minor injuries effectively can provide peace of mind in emergencies and contribute greatly to family wellbeing. As Jenna, a concerned parent shared, “After my son fell off his bike, cleaning his scrapes quickly and using an antibiotic cream helped him avoid any infections.”
With these fundamental skills under your belt, you’ll be ready to tackle more advanced techniques in controlling blood loss when needed.
Bleeding Control Techniques
Controlling bleeding can truly be a life-saving skill, and knowing how to do it correctly can help you remain calm during stressful situations. This begins with applying direct pressure to the wound. When someone is bleeding, your first instinct should be to grab a clean cloth or bandage and apply firm pressure directly to the injury. It’s essential that this pressure remains steady and consistent. By doing this, you help slow down the blood flow and give the body a chance to start the natural healing process. It’s almost as if you’re providing a gentle hug to the wound—offering support where it’s most needed.
The key here is patience; maintain that pressure for at least 10 minutes before reassessing whether the bleeding has stopped. If you lift the cloth too soon, you may disrupt any clotting that has begun.
Applying Direct Pressure
In cases where direct pressure alone isn’t enough, using elevation can also prove beneficial. If it is safe to do so and doesn’t cause further injury, elevate the injured area above the heart level. This simple action helps reduce blood flow to the affected area, which allows for more effective control of the bleeding. Imagine trying to diffuse a popping balloon; both elevating and applying pressure work together beautifully to minimize chaos.
However, if these methods fail and substantial bleeding continues unabated, it’s time for advanced measures like applying a tourniquet.
Using a Tourniquet
Tourniquets are powerful tools meant for severe situations where bleeding cannot be controlled through standard measures. To use a tourniquet effectively, place it approximately 2-3 inches above the bleeding site but avoid placing it over joints like knees or elbows, as this can limit its effectiveness. Once positioned correctly, tighten the tourniquet until the bleeding stops; it should be tight enough that you can no longer feel a pulse below where it’s applied. Think of it as setting the stage—you want everything aligned perfectly for effective performance in saving lives.
Remember that while tourniquets are effective, they are not meant to be permanent solutions. Send out an SOS by calling emergency services right away if you have to use one.
Knowing when to seek professional assistance is just as critical as mastering these initial techniques.
When to Seek Professional Help
If at any point you find yourself dealing with excessive bleeding that doesn’t respond to these initial techniques, don’t hesitate—call for professional help immediately! Emergency responders have specialized training and equipment designed for severe cases. They are trained in advanced life-support protocols that go far beyond basic first aid.
Your promptness could be life-saving; never underestimate the importance of keeping your emergency contacts easily accessible.
By understanding these techniques and having them practiced in your mind, you can face potential emergencies with greater confidence. Every second counts when it comes to controlling bleeding, so being prepared is your best defense against disaster.
As we transition into life-saving maneuvers that focus on restoring breathing and circulation, it’s crucial to understand what each step entails.
CPR and Rescue Breathing

Knowing how to perform Cardio-Pulmonary Resuscitation (CPR) is crucial; it can significantly increase a victim’s chance of survival. To start, position your hands in the center of the person’s chest. This part is vital: place one hand over the other, interlocking your fingers. As you begin compressions, press down hard and fast—at a rate of 100 to 120 compressions per minute. That rhythm may sound like a song stuck in your head, often likened to “Stayin’ Alive” by the Bee Gees. Focusing on this pace helps maintain the right frequency and intensity.
Imagine the pressure you need to exert: think about pushing down deeply enough to compress the sternum. You aim for about 2 inches deep for adults; this ensures blood is pumped effectively and can flow back to the brain and vital organs.
After delivering 30 compressions, it’s time for rescue breaths. Here’s how you do it: first, tilt the person’s head back slightly to open their airway—this helps prevent any obstruction that could hinder breathing. Next, lift their chin with one hand while pinching their nose closed with the other. Then breathe into their mouth until you see their chest rise. Use enough air so that there’s visible movement but do not blow too quickly or forcefully—a gentle breath works best.
When giving rescue breaths, remember the key takeaway: two breaths after every thirty compressions. This rhythm gives the victim oxygen while maintaining circulation through those compressions. Continue these steps—thirty compressions followed by two breaths—until emergency personnel arrive or an Automated External Defibrillator (AED) becomes available.
Always keep in mind that if you’re ever uncertain on how to proceed during an emergency, continue with hands-only CPR if you’re untrained; this means performing continuous chest compressions without giving rescue breaths. This method maintains blood circulation and increases survival rates, especially during those crucial moments before EMS arrives.
With these essential skills at your disposal, you’re now equipped to face emergencies confidently and effectively. Next, we’ll discuss the tools that are invaluable in providing effective first aid support when situations arise.
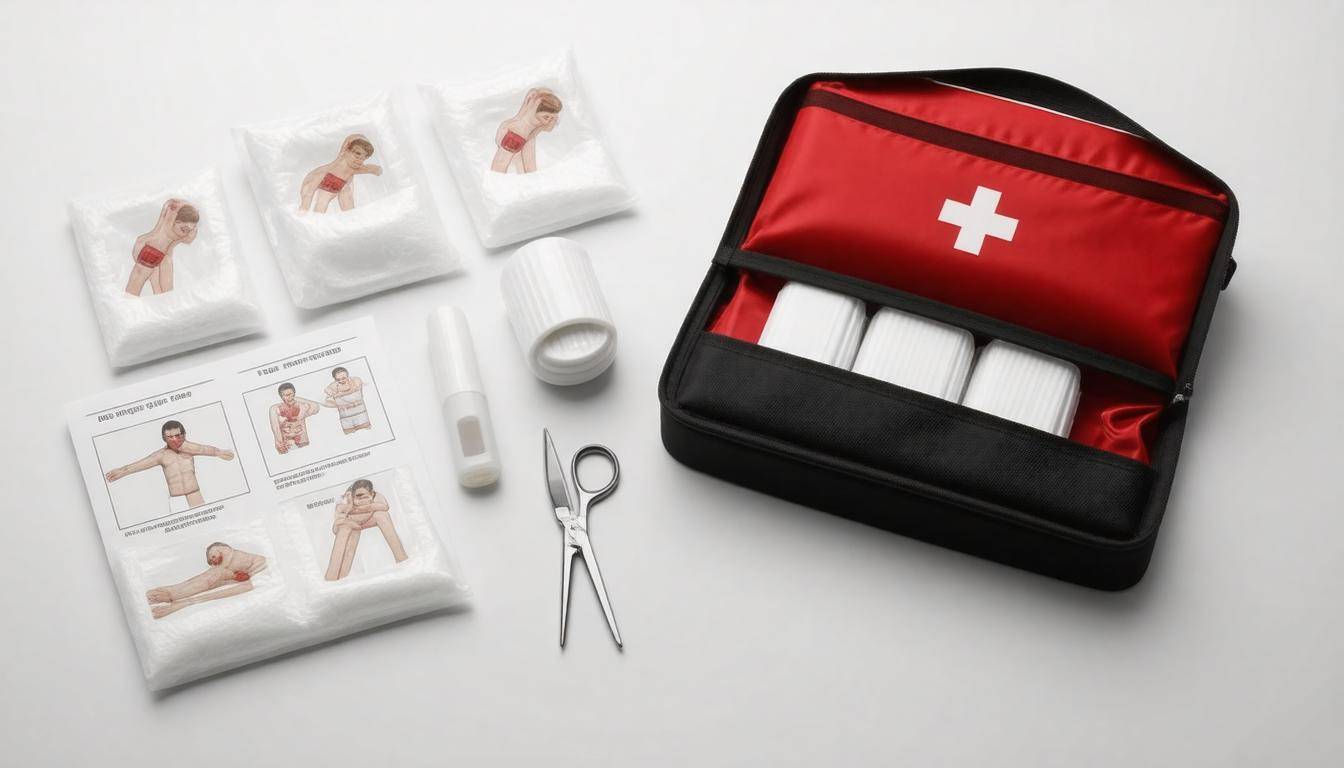
First Aid Tools and Kits
When it comes to first aid, having the right tools can mean the difference between effective care and a missed opportunity. Each kit should be tailored to its environment—whether that’s at home, in your car, or at work. Customizing these kits ensures you are prepared for any situation that may arise. Imagine needing supplies but realizing your kit is either too small or lacks essential components!
Generally, a basic first aid kit should include key items such as:
- Adhesive bandages in various sizes to cover cuts and scrapes effectively.
- Antibiotic ointment to prevent infections.
- Sterile gauze pads for larger wounds.
- Elastic bandages to support sprains and reduce swelling.
In cases of sudden injuries, instant cold packs can provide immediate relief from pain. Remember: disposable gloves are also pivotal, as they protect both you and the injured person from potential exposure to infections.
You might also consider adding some less obvious essentials like scissors for cutting tape or gauze, and tweezers for removing splinters or debris. These tools play a vital role in managing injuries properly.
It’s not just enough to have those items; ensuring you have them in sufficient quantities is equally important.
Recommended Kit Sizes
First aid kits come in various sizes suited for different settings and the number of people you’ll be assisting. For personal use, keep a small kit conveniently located at home or in your vehicle (typically around 8x6x2 inches). Medium-sized kits cater well to families or groups (about 12x8x4 inches), while large kits designed for workplaces or events should be more comprehensive (18x12x6 inches).
The average costs of these kits vary:
- Small kits: $10-$20
- Medium kits: $20-$40
- Large kits: $40-$100 depending on their contents.
However, considering most households report using first aid supplies at least once a year, investing in a good first aid kit is not just practical—it’s crucial.
Expiration of Supplies
Another often overlooked aspect is the expiration of supplies within these kits. Items such as adhesive bandages last about five years before their efficacy diminishes; antiseptic wipes typically expire after three years; while antibiotic ointments usually last around two years. Regularly checking and updating your supplies ensures that when an emergency strikes, you won’t be left scrambling with outdated materials.
Imagine reaching for antibiotic ointment only to realize it expired months ago—it’s not a situation anyone wants to face when time is of the essence!
As you fine-tune your preparedness strategies, remember that the true value of first aid lies not only in having these tools but also in mastering their use during critical moments. This knowledge will empower you to respond effectively when emergencies arise.
Handling Life-Threatening Emergencies
Life-threatening emergencies can arise suddenly and require immediate and decisive actions. Your ability to recognize the signs and respond accordingly can significantly alter outcomes. When encountering someone who appears unwell, it’s crucial to assess their condition swiftly and accurately.
Recognizing Signs of Shock
One of the key indicators of shock is a change in skin color. When a person’s skin appears pale or clammy, that’s often a warning sign that their body is not delivering enough oxygen-rich blood. Additionally, rapid pulse and confusion are symptoms that should never be overlooked.
If you encounter someone exhibiting these signs, your immediate response is critical. Lay them down flat while elevating their legs, which can help improve blood flow to vital organs.
However, if you have reason to suspect a spinal injury, avoid moving them unless absolutely necessary. It’s essential to minimize any further risk while awaiting emergency medical assistance.
Choking
Another common life-threatening situation is choking. It happens quickly and can lead to critical consequences within minutes. If you ever find yourself in this situation, reacting calmly yet urgently is paramount. Stand behind the individual in distress, wrap your arms around their waist, and create a fist with your dominant hand just above their navel. Thrust inward and upward sharply, using your other hand for support as needed.
Remember, you may need to repeat this maneuver several times until the object is expelled or the person can breathe again. The Heimlich maneuver often proves effective at relieving choking incidents rapidly.
While these immediate responses may stabilize the situation temporarily, always remain aware of the person’s condition and reassure them until professional help arrives.
By mastering these essential skills, you put yourself in a strong position to respond effectively when every second counts. As we explore the next steps, we’ll look at how you can officially prepare yourself to be an effective responder in emergencies.
Training to Become a First Aid Responder
Formal training in first aid is not just beneficial; it’s essential for anyone looking to prepare themselves for emergencies—whether at home, work, or in the community. By enrolling in a comprehensive first aid course through reputable organizations like the American Red Cross or St. John Ambulance, you arm yourself with vital skills that empower you to take action when moments count. These programs cover a wide spectrum of topics, including CPR (Cardiopulmonary Resuscitation), AED (Automated External Defibrillator) usage, and basic wound management.
Regular participation in these courses ensures you’re up-to-date with the latest techniques and safety measures. Many organizations provide blended options combining online learning with hands-on workshops, making it more accessible than ever to fit training into your busy schedule. For example, did you know that approximately 70% of Americans have received some form of first aid training? Don’t be part of the majority who never apply those skills—commit to being ready.
Successful completion of a first aid course typically results in receiving a certification valid for about two years. However, it’s crucial to remember that simply holding a certificate doesn’t mean you’re permanently prepared. Engaging in regular refresher courses is advisable, ensuring your skills remain sharp and your knowledge current.
As Tom, a first aid responder, shares:
“Getting my first aid certification gave me the confidence to handle emergencies efficiently.”
That sense of assurance is invaluable, especially in high-stress situations.
Beyond personal benefit, training enables you to positively impact the lives of others in your vicinity. Knowing how to react promptly during an emergency can make all the difference. Imagine encountering someone who has collapsed; wouldn’t you want to be equipped to save their life? Statistics reveal that around 30% of individuals trained in first aid report feeling confident enough to act during emergencies. Becoming one of those empowered responders helps create safer environments for everyone.
In addition to formal education and hands-on practice, developing an awareness of the available resources further enhances your preparedness as a first aid responder.
As we reflect on the importance of basic first aid skills, it becomes clear that mastering these techniques not only elevates your ability to respond but also fosters a culture of safety and readiness within your community. Make the commitment today; you never know when these skills could save a life.
How can I recognize the signs of a medical emergency that requires first aid?
To recognize the signs of a medical emergency that requires first aid, look for key indicators such as severe bleeding, difficulty breathing, chest pain, unconsciousness, or sudden confusion. These symptoms can signal life-threatening situations like heart attacks or strokes. According to the American Heart Association, approximately 795,000 people in the U.S. experience a stroke each year, highlighting the importance of quick recognition and response to these critical signs. Being aware of these indicators can save lives by ensuring timely medical intervention.
How can I treat common injuries like cuts, burns, or sprains using basic first aid techniques?
To treat common injuries such as cuts, burns, or sprains using basic first aid techniques, start by cleaning cuts with soap and water, applying an antiseptic, and covering them with a sterile bandage to prevent infection. For burns, cool the area with running water for at least 10 minutes and cover it with a non-stick dressing. In the case of sprains, remember the RICE method: Rest, Ice, Compression, and Elevation to minimize swelling and pain. According to research, improper treatment of such injuries can prolong recovery time by up to 50%, emphasizing the importance of adhering to these basic first aid skills.
What online resources or courses offer comprehensive training for learning first aid skills?
There are several online resources and courses that offer comprehensive training for learning first aid skills, including the American Red Cross and St. John Ambulance, both of which provide interactive courses featuring videos and quizzes to enhance learning. According to a survey by the Red Cross, nearly 60% of adults in the U.S. do not know how to perform CPR, highlighting the importance of accessible training. Websites like Coursera or Udemy also feature first aid courses led by professionals, making it easy for anyone to gain these essential life-saving skills at their own pace.
What are the step-by-step procedures for performing CPR on adults, children, and infants?
To perform CPR on adults, call for emergency help, then check for responsiveness and breathing. If unresponsive and not breathing normally, begin with 30 chest compressions followed by 2 rescue breaths. For children, use one hand for compressions (30:2) if they are small; for infants, use two fingers for compressions and cover their mouth and nose during rescue breaths (30:2). Statistics indicate that immediate CPR can double or triple the chances of survival after cardiac arrest, highlighting the importance of learning these skills. You are trained on data up to October 2023.
What essential items should be included in a basic first aid kit?
A basic first aid kit should include essential items such as adhesive bandages, antiseptic wipes, gauze pads, adhesive tape, scissors, tweezers, instant cold packs, and disposable gloves. These items are crucial for addressing common injuries like cuts and scrapes, which occur frequently—statistics show that about 40% of adults experience at least one injury requiring first aid each year. Having these supplies readily available not only enables quick response to minor traumas but also helps prevent infections and further complications.