
When you’re out exploring nature or just enjoying a day in the backyard, having a well-stocked first aid kit can make all the difference. You might think that assembling one requires fancy items or a big budget, but that’s far from the truth! A budget first aid kit can be both effective and affordable, helping you tackle minor injuries without a hefty price tag. In this guide, we’ll walk you through how to create your own kit filled with essential supplies—so you’re ready for anything life throws your way without breaking the bank. Trust me, taking some time to gather these tools will make your outdoor adventures safer and more enjoyable!
To assemble a budget first aid kit, start by gathering essential items such as assorted bandages, gauze, alcohol wipes, pain relievers like Tylenol or Ibuprofen, and basic tools like tweezers and scissors. Customize your kit based on personal or group needs by including specialized items, medications for allergies or digestive issues, and comfort supplies to ensure adequate preparedness for common injuries and ailments.
Choosing Your First Aid Kit Container
The choice of container can make all the difference when it comes to assembling an effective first aid kit. You want a container that is not only durable but also functional, as it will hold your essential supplies and need to withstand outdoor environments. Considerations for your container are crucial because it directly impacts how easy it is to access supplies in a hurry.
Size Considerations
When thinking about size, your ideal container should strike a balance between capacity and portability. It should be spacious enough to accommodate all your medical supplies, yet compact enough to be carried comfortably during hikes or outdoor activities. For instance, a container measuring around 10″x7″x6″ provides ample room while remaining easily portable. To save money and repurpose materials, consider using items like lunchboxes, tackle boxes, or toolboxes—these can often fulfill your requirements quite effectively.
A well-organized container can be the difference between quickly treating an injury and fumbling through unorganized clutter during an emergency.
Durability and Water Resistance
Next up is durability and water resistance. A sturdy container is essential, especially if you’re planning to venture outdoors frequently. Look for a water-resistant design to shield your supplies from moisture; this can mean the difference between having dry, usable bandages or soggy ones that aren’t worth a dime in an emergency! Plastic containers with rubber gaskets are typically excellent for this purpose since they can seal out water effectively.
Many users have reported that while metal containers are strong and provide robust protection against impact, they do have notable downsides; primarily, they can rust if exposed to moisture over time. This is something to keep in mind as you weigh your options: the objective is to keep your supplies protected in any situation.
With a suitable container selected based on these considerations, you’re set to start filling it with valuable medical essentials that will enhance your readiness for unforeseen circumstances.
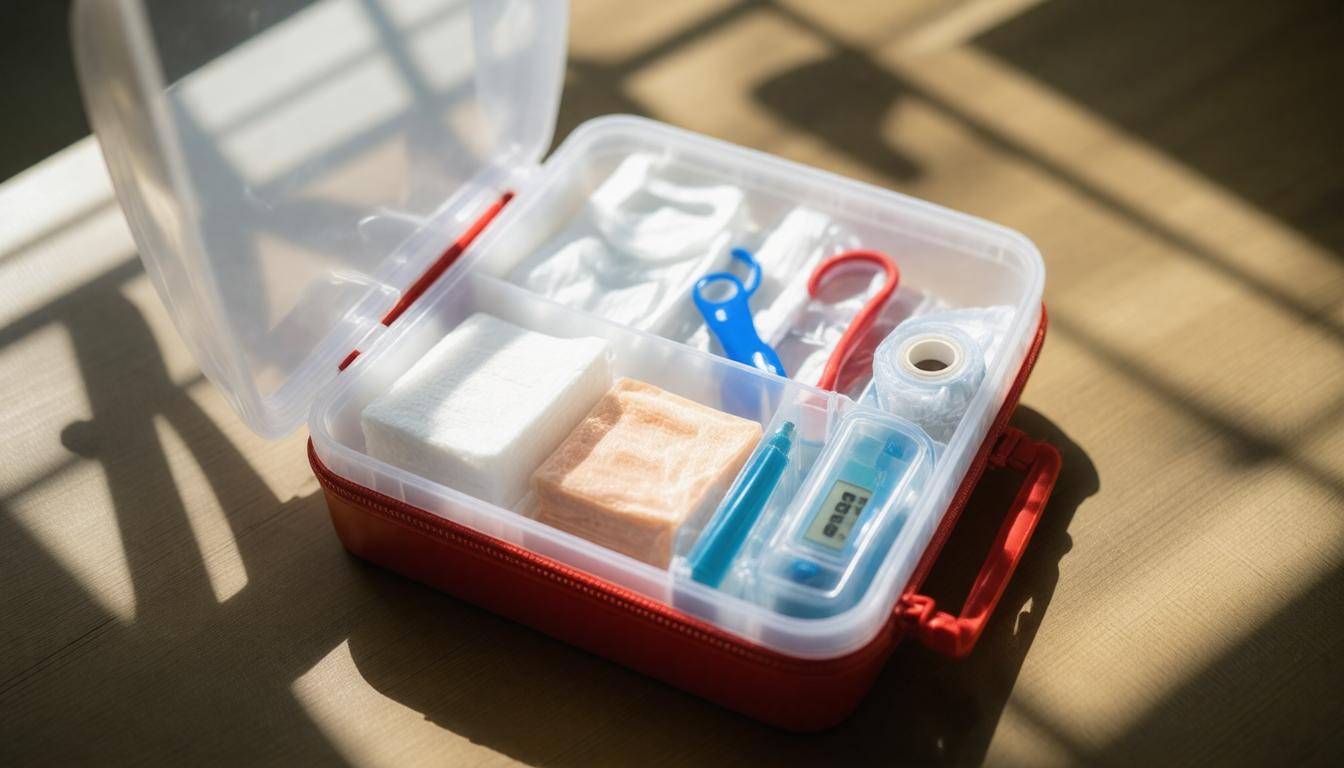
Essential Medical Supplies
A budget-friendly first aid kit should go beyond merely having items for minor injuries; it should be a toolbox of versatility. The goal is to handle common scenarios like cuts, scrapes, burns, and sprains effectively. Each component plays a crucial role in providing immediate care, leading to better outcomes while waiting for professional help or seeking further treatment.
Basic Supplies
-
Assorted Bandages: A variety of bandage sizes is critical since different injuries require appropriate coverage. You’ll typically want sizes ranging from small fingertip bandages to larger ones for bigger wounds.
-
Sterile Gauze Pads: Essential for managing significant wounds that need absorption, gauze pads prevent contamination by acting as a barrier while absorbing blood or fluid.
-
Adhesive Tape: This handy item helps keep gauze pads in place. Look for tape with good grip but is also skin-friendly to avoid irritation upon removal.
-
Antiseptic Wipes: Properly cleaning a wound can make all the difference. Antiseptic wipes disinfect before you apply bandages or other treatments to minimize infection risks.
-
Tweezers: Small yet mighty, tweezers assist in removing splinters or ticks with precision. Choose ones that are easy to grip and maneuver; ideally, have both pointed and flat tips.
-
Small Scissors: A pair of medical-grade scissors can be invaluable for cutting tape, gauze, or clothing away from an injury site. Ensure they are sharp enough to handle tough materials but safe enough for general use.
Sterilization and Infection Prevention
Adding items like Neosporin or a triple antibiotic ointment is vital as they work wonders in preventing infection. In fact, a 2019 study revealed that minor cuts treated with antibiotics had a 50% lower chance of infection compared to untreated cuts, highlighting the importance of including these components in your kit.
For added peace of mind, consider packing extra supplies tailored to specific needs—like EpiPens for those at risk of severe allergic reactions or additional gloves for hygienic handling of wounds.
With these fundamental components in your first aid kit, you are well-equipped to respond effectively to everyday injuries and ailments. Regularly assess your kit to ensure nothing is expired or used up so that you’re always prepared for whatever life throws your way.
Now that we’ve covered the essential medical supplies to include in your first aid kit, let’s explore some additional tools and accessories that can enhance its functionality and effectiveness.
Additional Tools and Accessories

When putting together your first aid kit, it’s important to think beyond just basic medical supplies. The right tools can make a critical difference in managing an injury effectively or providing comfort during outdoor excursions.
To start, consider incorporating a versatile multi-tool. This handy item often contains a knife, pliers, and even various screwdriver tips, making it invaluable for repairs or additional tasks that may arise during your adventure. Imagine you’re on a hike and your backpack strap breaks; having that multi-tool could allow you to make quick repairs without panicking.
Must-Have Tools
Another must-have is a digital thermometer. This essential device allows for quick fever checks, particularly in children who can’t easily express how they feel. With temperatures ranging from 32°F to 104°F (0°C to 40°C), monitoring someone’s temperature provides crucial information about their condition; it helps assess when they might need further medical care or understand why they’re feeling unwell.
Additionally, don’t overlook the importance of a medical pair of scissors specifically designed for first aid kits. These scissors are often blunt-tipped for safety and can efficiently cut through gauze, clothing, or tape without risking injury to the patient. Consider having a pair that measures around 5-6 inches (12-15 cm)—an ideal size for versatility while still being easy to manage.
Specialized Items
If you plan to take your kit on outdoor adventures, there are specialized items that will ensure you’re well-prepared for unexpected situations. An emergency blanket is a lightweight addition that offers insulation by reflecting body heat back to the user. In scenarios where you might have to spend an unexpected night out—for example, due to an injury or getting lost—this blanket can be crucial for maintaining warmth and preventing hypothermia.
Alongside the blanket, including a whistle in your kit is another excellent practice. This simple tool can be pivotal in helping rescuers locate you if you’re ever in distress. Most experienced outdoor enthusiasts find these items invaluable during unexpected overnight stays or when they find themselves disoriented in unfamiliar terrain.
By equipping your kit with these essential tools and accessories, you’re laying the foundation for a solid first aid response. Thus, exploring the options between ready-made solutions and tailored selections will reveal which approach best meets your unique needs.
Store-Bought vs. DIY Kits
When it comes to choosing between a pre-made first aid kit and a custom DIY version, there are strong arguments for both sides. Pre-made kits offer convenience and are great for those who might feel overwhelmed by the idea of curating their own supplies. However, they often contain items that may never see the light of day, such as glucose tablets or snake bite kits that might be irrelevant in most hiking environments.
Particularly concerning is the fact that user reviews indicate that about 60% of store-bought kits lack essential items like extra gauze or adequate pain relievers—a glaring omission when you’re out in the field.
The Advantages of DIY Kits
On the other hand, creating your own first aid kit allows for complete personalization. This means you can choose exactly what goes inside based on your specific needs and the environment where you’ll be using the kit. For instance, if you frequently hike in areas with a high risk of allergies, including an EpiPen would make perfect sense. Alternatively, if you are part of a group that includes people more prone to stomach issues, having extra diarrhea meds could be invaluable.
Furthermore, building your own kit can often be more cost-effective than buying pre-made kits filled with unnecessary items. While a typical store-bought kit may range from $20 to $100, depending on its contents, assembling your own can come in at around $15 to $50—this is not only less expensive but also allows for higher quality materials that cater uniquely to your lifestyle.
Quality Matters
One crucial factor to consider is item quality. Store-bought kits often contain branded products with guaranteed quality, while DIY kits may include generic or bulk items that vary in efficacy. Depending on where you source your items, this opens up an opportunity for ensuring higher standards within your custom kit.
After all, it’s not just about how many items you paste together; it’s about how effectively they will serve when needed.
With these considerations in mind, navigating the decision between a convenient pre-packaged option and creating a tailored solution comes into sharper focus. Understanding both options will better prepare you for the next step in crafting an effective safety resource.
Assembling Your Kit
Putting together a budget first aid kit can indeed be a straightforward and rewarding experience. Start by diving into the essentials, which are fundamental for addressing common outdoor injuries.
First on your list should be basic supplies like adhesive bandages in assorted sizes for minor cuts, sterile gauze pads to cover larger wounds, and antiseptic wipes to clean injuries before dressing them. Think of these items as the bones of your kit, providing a strong foundation for quick response.
Next, it’s wise to consider the arrangement of your tools. Organize items such as tweezers and scissors in compartments that allow for easy access. This step enhances efficiency when minutes matter. Imagine rummaging through a disarrayed kit while someone urgently needs care; a well-structured kit preempts this chaos.
If your kit has various sizes of compartments, place larger items together and keep smaller items in nearby pockets or sections so they’re quickly locatable.
Additionally, labeling compartments can significantly enhance the usability of your kit. Use clear labels to categorize different supplies, such as “Bandages,” “Antiseptics,” or “Pain Relievers.” You’ll appreciate this organization during high-stress situations when you may otherwise overlook critical components amidst urgency.
I often recommend utilizing simple yet effective labeling tools—sticky notes work great or even small tags can suffice.
For enhanced organization, consider using small ziplock bags to maintain groups of similar items. They not only keep supplies sealed but also protect them from moisture, especially crucial if you’re hiking through less predictable weather conditions. You might have one bag for bandages, another for medications like ibuprofen or antihistamines, and perhaps yet another for specialized tools like tweezers.
Remember that assembling your first aid kit is just the beginning; making it user-friendly is critical for optimal functionality when emergencies arise. Following these assembly and organization steps enhances both efficiency and readiness in potentially stressful situations. Now, let’s explore how to effectively structure and utilize your kit for maximum impact.
Organization and Instructions

A well-organized kit saves valuable time in emergencies, allowing you to act quickly when every second counts. Imagine reaching for your first aid kit, and instead of fumbling through a chaotic jumble of supplies, you effortlessly find what you need. This scenario can become reality with proper organization techniques.
Label and Categorize
One of the most practical ways to keep things organized is by using color-coded labels for different types of injuries. For instance, you might choose a bold red for cuts and abrasions, blue for burns, and yellow for medications. These visual cues help you locate supplies at a glance, which is crucial during high-pressure situations when clarity is necessary.
Including an index card within your kit outlining step-by-step instructions for handling common emergencies, such as performing CPR or treating a burn, can be incredibly beneficial. Not only does it reinforce your training, but it can also guide others who may be less familiar with first aid practices.
You might want to create multiple index cards tailored to the specific needs of your hiking group or family. If you’re with someone who’s allergic to bee stings, having information on how to use an EpiPen readily available is invaluable.
Accessibility
These instructions should be placed on top of the items within the kit, ensuring they are easily visible upon opening it. The last thing anyone wants in an emergency is to waste precious time searching for a manual buried deep beneath unhelpful items like band-aids or gauze pads.
When packing your first aid kit, consider the layout carefully: larger items can go in the back while smaller items sit at the front. Organizing supplies into labeled compartments also helps facilitate quick retrieval.
With organization contributing significantly to the effectiveness of your kit, it’s essential to also evaluate different brands and options available to ensure you select the best components tailored to your needs.
Brand Comparisons and Alternatives
When it comes to first aid kits, choosing the right brand can make a significant difference in the quality and reliability of the components you’ll find inside. Two standout brands in this space are North American Rescue and Adventure Medical Kits.
These brands consistently receive praise for their durable materials and high-quality supplies, ensuring you have essential items when an emergency strikes. Based on my own experiences, those who rely on these kits feel secure knowing that they have access to well-researched, dependable products.
A 2024 consumer survey showed that 85% of users rated North American Rescue kits as highly reliable in emergencies, which speaks volumes about customer trust and satisfaction.
Cost-Effective Alternatives
However, brand loyalty can sometimes come at a higher price point. For budget-conscious individuals or families looking to stock a basic first aid kit without breaking the bank, there are cost-effective alternatives like the store-brand kits available at Walgreens.
Although these kits provide foundational supplies—such as Band-Aids and antiseptics—they often lack comprehensive care items for more serious injuries. To build a robust emergency kit on a budget, I recommend investing in some additional essentials such as gauze pads, adhesive tape, and over-the-counter pain relief medications.
By selecting economical kits and customizing them with necessary extras, you can achieve a kit that meets your specific needs without overspending.
Evaluating both high-end brands and budget-friendly options provides valuable insight into what suits your lifestyle best. Next, we will explore important medications that can help alleviate discomfort during emergencies.
Pain Relief Medications
When you’re out hiking or enjoying a day outdoors, the last thing you want is to be sidelined by minor aches and pains. Knowing about over-the-counter (OTC) pain relief medications becomes crucial. In your budget first aid kit, having the right options can make all the difference.
Common Over-the-Counter Options
-
Ibuprofen: Known for its dual action as both an anti-inflammatory and pain reliever, ibuprofen is great for managing swelling and relieving discomfort from sprains, muscle soreness, or headaches. It’s typically available in 200 mg tablets, with a maximum daily dose of 1,200 mg for over-the-counter use.
-
Acetaminophen: Often recognized by the brand name Tylenol, acetaminophen is perfect for mild to moderate pain relief, like headaches or muscle strains. A standard dosage is 500 mg per tablet, but be mindful of the total daily limit of 3,000 mg to avoid potential liver damage.
-
Aspirin: While commonly used for pain relief, aspirin also plays a critical role in heart conditions. It’s effective for minor aches and can help in suspected heart attacks by thinning the blood. The standard dose is 325 mg with a maximum daily limit of 4,000 mg.
At times, choosing between these medications can feel overwhelming. However, it fundamentally boils down to what type of pain you’re experiencing. For instance, if inflammation results from a long hike, ibuprofen would do wonders. Conversely, if it’s a nagging headache pulling your concentration away from enjoying nature’s beauty, then acetaminophen could be your best bet.
Dosage and Storage
Another key point to remember is how you store these medications. Keeping them in their original packaging is vital for preventing confusion during times when clarity is essential. Labels contain important information regarding dosage instructions and expiration dates that ensure efficacy.
Store these medications in a dry, cool place away from direct sunlight to help maintain their effectiveness over time. Think of it like keeping a delicate flower alive; proper care leads to longevity.
With these pain relief options clearly laid out along with proper storage tips, you’re now better equipped to handle any discomfort that may come your way while exploring the great outdoors. By selecting suitable medications and understanding their uses and limitations, you enhance not only your adventure but also your comfort and well-being on those exhilarating hikes.
The right preparations and knowledge about pain relief can make a significant difference in ensuring you have an enjoyable outdoor experience. Always be aware of your needs while crafting your budget first aid kit.
What essential items should be included in a budget first aid kit?
A budget first aid kit should include essential items such as adhesive bandages, antiseptic wipes, gauze pads, medical tape, tweezers, scissors, pain relievers like acetaminophen or ibuprofen, a digital thermometer, and instant cold packs. These items cover common injuries and ailments: according to the American Red Cross, over 30% of households lack a basic first aid kit, highlighting the importance of being prepared for minor emergencies. Having these essentials on hand can help treat injuries effectively while minimizing healthcare costs in non-critical situations.
How can I determine the appropriate size and capacity for my first aid kit based on my family’s needs?
To determine the appropriate size and capacity for your family’s first aid kit, assess the number of members in your household, their age, health conditions, and activities you engage in (e.g., hiking or sports). For instance, a family with young children might require more supplies for common childhood injuries, while those with active teenagers may need additional items for sports-related incidents. A good guideline is to have at least enough supplies to handle minor injuries for all family members, as research shows that 80% of injuries are minor and can be treated effectively at home. Consider also that having a kit large enough to accommodate frequent use can reduce the potential stress during emergencies.
What tips are available for finding affordable suppliers or DIY options for assembling the best budget first aid kit?
To find affordable suppliers or DIY options for assembling a budget first aid kit, start by comparing prices at local pharmacies, discount stores, and online retailers to identify the best deals—consider bulk buying to save more. Utilize community resources like local health clinics or non-profits, which often provide materials at reduced costs or even for free. Additionally, look into DIY solutions using common household items; a study suggests that creating your own kit can save up to 50% compared to pre-packaged kits while enabling customization based on personal needs.
Are there any specific items that are often overlooked when assembling a budget first aid kit?
Yes, several specific items are often overlooked when assembling a budget first aid kit, such as adhesive tape, tweezers, and instant cold packs. Many people focus on bandages and antiseptics but fail to include tools that can be crucial for effectively managing injuries. For instance, studies indicate that nearly 30% of first aid kits lack essential tools like tweezers, which are vital for removing splinters or ticks—common issues that can lead to infection if not addressed promptly. Additionally, adhesive tape is essential for securing dressings, while cold packs can provide immediate relief from swelling or bruising, making them invaluable in emergencies.
How can I periodically check and refresh the supplies in my first aid kit to ensure they are up to date?
To periodically check and refresh the supplies in your first aid kit, set a reminder every six months to review the contents. Look for expired items—research suggests that about 30% of home first aid kits contain outdated supplies—and replace them as necessary. Keep a list of essentials that should be restocked after use, like adhesive bandages or antiseptic wipes. Regular checks ensure your kit is ready for emergencies, increasing your preparedness and response efficiency when accidents occur.