
Imagine stepping outside on a bright sunny day and using that sunlight to cook your favorite meal—sounds cool, right? Enter the world of solar cookers! These clever devices turn sunshine into heat, allowing you to whip up delicious dishes without any fuss over fuels or electricity. Whether you’re looking to save energy, cut down on expenses, or have some fun with a DIY project, building your own solar cooker can be a rewarding adventure. In this guide, we’ll walk you through how to create your very own solar oven, from the essential materials needed to step-by-step building instructions. Let’s get started and harness the power of the sun!
The complete building instructions for a DIY solar cooker typically include gathering materials such as cardboard, aluminum foil, and an insulating layer; constructing a box design where reflective surfaces direct sunlight into the cooking area; and ensuring the cooker is positioned to maximize sunlight exposure. Detailed resources can often be found through dedicated websites that provide step-by-step guidance tailored to various designs, helping you successfully create an effective solar cooking solution.

The DIY Solar Cooker Overview
A solar cooker is an innovative device that harnesses the sun’s energy, transforming sunlight into heat to prepare food without relying on traditional fuels or electricity. At its core, a solar cooker takes advantage of reflective surfaces that concentrate sunlight into a designated cooking area, allowing it to reach sufficient temperatures for cooking slowly but efficiently. This environmentally-friendly alternative not only promotes sustainability but also offers a unique opportunity to engage with renewable energy.
One particularly popular design – the pizza box solar oven – exemplifies how you can employ simple materials like cardboard and aluminum foil to construct an efficient cooking tool. It’s often used in educational environments, making it an effective hands-on project for teaching students about solar energy principles. Through this design, users can experience practical applications of science while enjoying the delightful process of cooking outdoors.
The benefits of using solar cookers extend beyond mere convenience; they hold significant potential for communities around the globe. According to data from Solar Cookers International, approximately 3 billion people in developing countries stand to benefit from using these devices. By decreasing reliance on fuels such as wood and charcoal, solar cookers can help alleviate deforestation and lower household energy costs. Thus, this technology not only serves individual needs but also contributes positively to broader environmental and economic issues.
Having understood the importance and practicality of solar cookers, we now shift our focus to the crucial resources needed for constructing your own version.
Essential Materials for Construction
First and foremost, the reflective surface is crucial in directing sunlight into your cooker. Aluminum foil stands out as an excellent choice because it has a high reflectivity rate, making it ideal for maximizing the sun’s rays. When lining the inside of your pizza box or other cooking enclosure, ensure that all surfaces are covered adequately. Any gaps could cause heat loss, which ultimately diminishes the cooking efficiency of your solar cooker. You can also opt for reflective Mylar film if you want even more heat absorption; this material is designed specifically for enhanced thermal retention.
To achieve optimal results, don’t skimp on the aluminum foil! Use multiple layers if possible, as this will not only reflect sunlight effectively but also help with insulation later on. A well-reflected surface ensures that light is turned into heat rather than simply bouncing off unused.
Complementing the reflective element is the insulation of your cooker.
Insulation serves to trap heat within the cooking chamber, ensuring that it builds up effectively over time. Materials like cardboard or styrofoam work exceptionally well in this role due to their properties, which prevent the loss of warmth through conduction. The inner walls of your cooker should be lined with several layers of insulation to create an effective thermal barrier. This ensures that once the sun heats up your cooker, that heat stays put instead of escaping.
Imagine this: When you insulate your solar cooker properly, it can reach temperatures exceeding 125°F on sunny days—sufficient for tasks like melting cheese on a tortilla or reheating leftovers.
Now let’s talk about a critical feature that plays a pivotal role in temperature management.
The clear cover is an essential component of any solar cooker design. Using clear plastic wrap or an old glass panel allows sunlight to enter while keeping warm air trapped inside. This creates a greenhouse effect, crucial for raising and maintaining internal temperatures. If using plastic wrap, it’s important to ensure there are no tears or punctures, as any small openings can inhibit heat retention.
A tightly sealed clear cover also aids in preventing moisture from getting inside, which could dampen food items you’re planning to cook. Make it a habit to check and replace these covers periodically to maintain their effectiveness.
Putting all these components together is key for your solar cooker’s success and functionality.
By gathering these materials thoughtfully and applying them during construction, you’ll maximize the efficiency and cooking ability of your DIY solar cooker. Each component serves a specific purpose designed to harness sunlight effectively, ensuring you’re equipped for delicious outcomes whenever you decide to fire up (or rather sun up) your cookery skills!
With these essential materials laid out, the next steps will guide you through assembling each part into a functioning unit.
Step-by-Step Building Process

The first step in building your solar cooker is to prepare the base. You’ll want a large square or rectangular box; ideally, it should be a light-colored and sturdy container, like one used for storing appliances. This type of box withstands heat while effectively reflecting sunlight. Ensure the inside of the box is clean and dry, as any moisture could interfere with the cooking process or lead to mold over time.
Once you have the perfect box, it’s time to transform its interior into a solar powerhouse.
In Step II, you’ll add reflective material that will change the game for your solar oven. Line the interior of the box with aluminum foil or reflective Mylar film. Take special care to smooth out any wrinkles because even small creases can disrupt sunlight reflection. Cover every inch of the interior surface—this maximizes heat retention and ensures all available sunlight is harnessed for cooking.
After reflecting surfaces come insulation, which plays a vital role in retaining heat within your solar cooker.
In Step III, focus on insulating the walls of your box to minimize heat loss. Use cardboard panels or sheets of styrofoam, pressing them tightly against the box’s inner surfaces. Create a barrier that keeps warmth from escaping, ensuring that when sunlight hits your cooking pot, it remains hot enough for effective cooking. Remember, even small gaps can allow heat to escape, so ensure everything fits snugly.
With insulation in place, we’re moving on to creating a method to let sunlight in while keeping that precious heat trapped inside.
Step IV involves installing a glass panel or using clear plastic wrap over the top opening of the box. This transparent barrier acts as a window, allowing light to flood into your cooker while preventing heat from escaping. Secure it tightly—if you’re using plastic wrap, stretch it around the edges and tape it down well; if you’re using glass, ensure it fits securely without any openings around the edges.
Now that you’ve constructed your solar cooker, positioning it becomes key to harnessing sunlight effectively.
In Step V, position your solar cooker outside in direct sunlight. Adjust its angle throughout the day to keep it facing the sun directly; this ensures optimal light exposure. It’s also helpful to check temperatures periodically using a thermometer inside the oven—this will help you understand its cooking capacity before preparing meals. When everything aligns—sunlight streaming through and warmth radiating within—you’re set for delightful outdoor cooking.
Through these steps, you’ll not only build an efficient cooking tool but also master the basics of using renewable energy in everyday life—a rewarding experience that resonates far beyond just making meals!
With your DIY solar cooker ready for action, understanding how to make the most of every ray becomes essential for successful cooking ventures.
Optimizing Sunlight Capture
Optimizing the amount of sunlight captured is crucial to the efficiency of your solar cooker, as it directly influences how well your meals will cook. The more sunlight you can collect and concentrate, the hotter your cooker will become. A few adjustments in design and operation can substantially enhance your solar cooker’s performance.
Adjustable Reflectors
One effective way to increase sunlight capture is by adding adjustable reflectors made from cardboard covered with shiny aluminum foil. These reflectors act like mirrors, directing extra sunlight into the cooking chamber. You can create these by cutting pieces of cardboard and wrapping them in foil, then strategically positioning them at angles around your solar cooker.
Nestled near the edges, these reflectors should be adjustable so they can easily shift position throughout the day. This flexibility allows you to continuously optimize for the sun’s angle without needing to make drastic changes.
It’s worth mentioning that these reflectors can also protect against wind, helping maintain heat inside your cooker while enhancing its overall effectiveness.
Tracking the Sun
Regularly adjusting the angle of your cooker to follow the sun’s movement across the sky is another game-changer. To achieve this, consider utilizing a simple mechanism like a rotating base. Whether homemade or purchased, such bases allow you to pivot your solar oven effortlessly.
Research indicates that actively tracking the sun can boost your solar cooker’s efficiency by up to 30%. This means not only will your food cook faster, but it may result in better textures and flavors as well—think perfectly melted chocolate fondue instead of clumpy goo.
Another tip is to monitor shadows during peak sunlight hours; this helps position your cooker optimally. By adjusting according to the sun’s trajectory every 10-15 minutes, you ensure consistent energy absorption where it matters most.
Experimentation and Adaptation
As you explore solar cooking further, don’t hesitate to get creative. Try experimenting with different reflector shapes or positions until you find what works best for your setup. For instance, using curved or more angular reflectors might yield varying results in sunlight capture.
Keep a notebook handy during these experiments to jot down notes about which strategies enhanced cooking times or improved dish quality. Over time, you’ll develop an intuitive understanding of how best to operate your solar cooker based on environmental conditions.
Incorporating these techniques will lead to a richer experience as you engage with solar cooking, paving the way for further exploration into recipes and methods that bring your meals to life.
Cooking Techniques and Recipes
Now that your solar cooker is all set up, it’s essential to master some practical techniques for getting the best results. These methods not only add flavor but also enhance the entire experience of solar cooking.
Techniques
Pre-heating
One critical step that shouldn’t be overlooked is pre-heating your solar cooker. This process typically takes about 30 minutes, allowing the cooker to reach optimal temperatures. Think of it like warming up your car in winter; it’s a crucial preparation that makes everything run smoothly. Skipping this step may result in undercooked meals or extended cooking times, which could discourage you from wanting to use the solar cooker again.
Stirring and Rotating
As you get into the rhythm of using your solar cooker, remember to stir and rotate your dishes regularly. This practice is particularly important when preparing items like stews or rice that benefit from consistent heat distribution. By stirring, you enhance flavor development and prevent unwanted sticking or burning at the bottom. Take a moment every half hour to check in on your dish; you’ll be rewarded with deliciously even cooking and better results.
Recipes
S’mores
For a sweet treat that’s as simple as it gets, consider making S’mores using your solar cooker. Just stack graham crackers, pieces of chocolate, and marshmallows together and place them inside the cooker. After around 10-15 minutes, you’ll have a melty delight that’s perfect for sharing (or keeping all to yourself!). It’s a quick and fun activity that highlights the joy of solar cooking.
Roasted Vegetables
If you’re keen to explore something savory, try roasting vegetables next! Dice seasonal vegetables you love—perhaps zucchini, bell peppers, and onions—to create a vibrant medley. Season lightly with olive oil, salt, and herbs before placing them into the solar cooker. Cooking time for roasted vegetables typically ranges from 1-2 hours until they become tender and caramelized. The waiting game becomes an opportunity to enjoy nature while your meal is gently prepared by the sun’s energy.
Having these techniques and recipes at your disposal sets the stage for effective usage of your solar cooker. With this foundational knowledge, let’s turn our attention to how to keep your cooker in top shape while addressing any potential concerns.
Maintenance and Troubleshooting
Proper maintenance ensures that your solar cooker serves you well season after season, allowing you to harness the sun’s energy efficiently. A little effort goes a long way in keeping it in peak condition, so let’s explore the essential maintenance tasks you’ll want to perform regularly.
Cleaning
Just like any cooking appliance, a clean surface is vital for effective heat absorption. At least once a week, take a moment to wipe down the reflective surfaces and the glass panel of your solar cooker. Dust and foreign particles can significantly impede sunlight penetration and heat concentration. Use a damp cloth to gently remove any dust or residue; this simple act helps ensure that when you’re ready to use your oven again, it’s working at its full potential. Remember, avoiding harsh chemicals is key—stick with water or gentle soap solutions that won’t leave residues behind.
Now that you’ve kept those reflective surfaces shining bright, it’s time to look closely at the structural integrity of your solar cooker.
Inspection
Regular inspections are another critical aspect of solar cooker maintenance. Make it a habit to frequently check for any tears in the insulation or reflective material. These small issues can lead to significant heat loss during cooking sessions. If you happen to spot any damage, address it immediately rather than putting it off until later—reparative steps are often quite simple and prevent larger problems down the line.
Common Issues
-
Reflective Material Peeling: The sun can take a toll on reflective materials over time, leading them to peel or degrade. If you notice this happening, consider reinforcing weak areas with fresh aluminum foil or replacing damaged sheets entirely.
-
Insulation Wear and Tear: Insulation may compress or fray due to regular use and exposure to elements. Check for any sagging areas; if you find any major damage, re-insulate using new materials to maintain efficiency.
-
Glass/Perspex Panel Cracks: A cracked panel can severely limit your cooker’s effectiveness by letting heat escape. If you see any cracks forming, replace the panel promptly to keep your cooking results consistent.
By remaining diligent in cleaning and inspecting your solar cooker, you’re not just maintaining an appliance; you’re setting the stage for sustainable cooking solutions powered by renewable energy.
Advantages of Solar Cooking
Solar cooking offers a multitude of benefits, establishing itself as an integral facet of eco-friendly living. First and foremost, let’s consider the environmental impact. By harnessing sunlight for cooking, we reduce our reliance on fossil fuels and electricity. This shift not only minimizes our carbon footprint but also contributes to cleaner air and an overall healthier environment. Imagine a world where fewer pollutants are released into the atmosphere—solar cookers are a step in that direction.
Beyond environmental considerations, solar cooking brings substantial economic benefits.
By adopting solar cooking methods, households can eliminate the need for conventional cooking fuels such as gas, wood, or charcoal. This leads to significant savings on fuel costs and can alleviate financial stress in areas where fuel prices fluctuate dramatically. In fact, families can save up to 80% on fuel costs by simply using solar energy for their culinary needs. It’s quite liberating to know that by utilizing free sunshine, you’re effectively slashing your monthly expenses—all while doing something good for the environment.
But the perks don’t stop there; there are also critical health benefits associated with solar cooking.
Traditional cooking methods involving wood or charcoal often contribute to indoor air pollution, leading to smoke inhalation which can result in long-term health issues. Transitioning away from these methods reduces the risk of respiratory problems caused by toxic fumes. Instead, with solar cookers, you can cook outdoors without worrying about harmful smoke filling your home and lungs. This simple change promotes a healthier lifestyle for everyone in your family and even your community.
All of these benefits converge to make solar cooking not just a trend but a sustainable lifestyle choice. Here’s a quick summary:
- Environmental Impact: Reduces reliance on fossil fuels and electric power, minimizing carbon footprints.
- Economic Benefits: Eliminates costs associated with traditional cooking fuels.
- Health Benefits: Reduces risks related to smoke inhalation from conventional fires.
These advantages extend even further into our everyday experiences and practices.
Engaging with solar cooking fosters a sense of self-sufficiency while encouraging creativity in the kitchen. You may find yourself experimenting more with meals and embracing new recipes like baked potatoes and s’mores—who knew cooking could be both fun and environmentally conscious? As we invest time in building and perfecting our DIY solar cookers, we not only learn valuable skills but also cultivate a deeper appreciation for renewable energy sources.
As we explore these innovative techniques further, there’s much more to uncover about additional experiments that can enhance your understanding and utilization of solar energy.
Additional Projects and Experiments
One of the fascinating aspects of solar cooking is its versatility beyond just preparing meals. If you’ve enjoyed the basics, there are numerous projects you can undertake that harness the sun’s power in innovative ways. For example, constructing a solar water purifier can be an enlightening endeavor for anyone interested in sustainable practices. This project utilizes sunlight to distill water, effectively transforming contaminated sources into clean drinking water.
With simple materials like a clear plastic container or even a makeshift still made from aluminum foil, you can capture the sun’s heat effectively. The process involves placing dirty water in a shallow dish under a covering that allows sunlight in but keeps contaminants out. As the water heats up, it evaporates, condenses on the underside of the cover, and drips down into another container. This method teaches valuable lessons about condensation and evaporation while emphasizing the importance of clean drinking water—a vital resource.
Exploring Advanced Designs
Beyond these basic concepts, venturing into more advanced designs can unlock even greater potential for solar cooking.
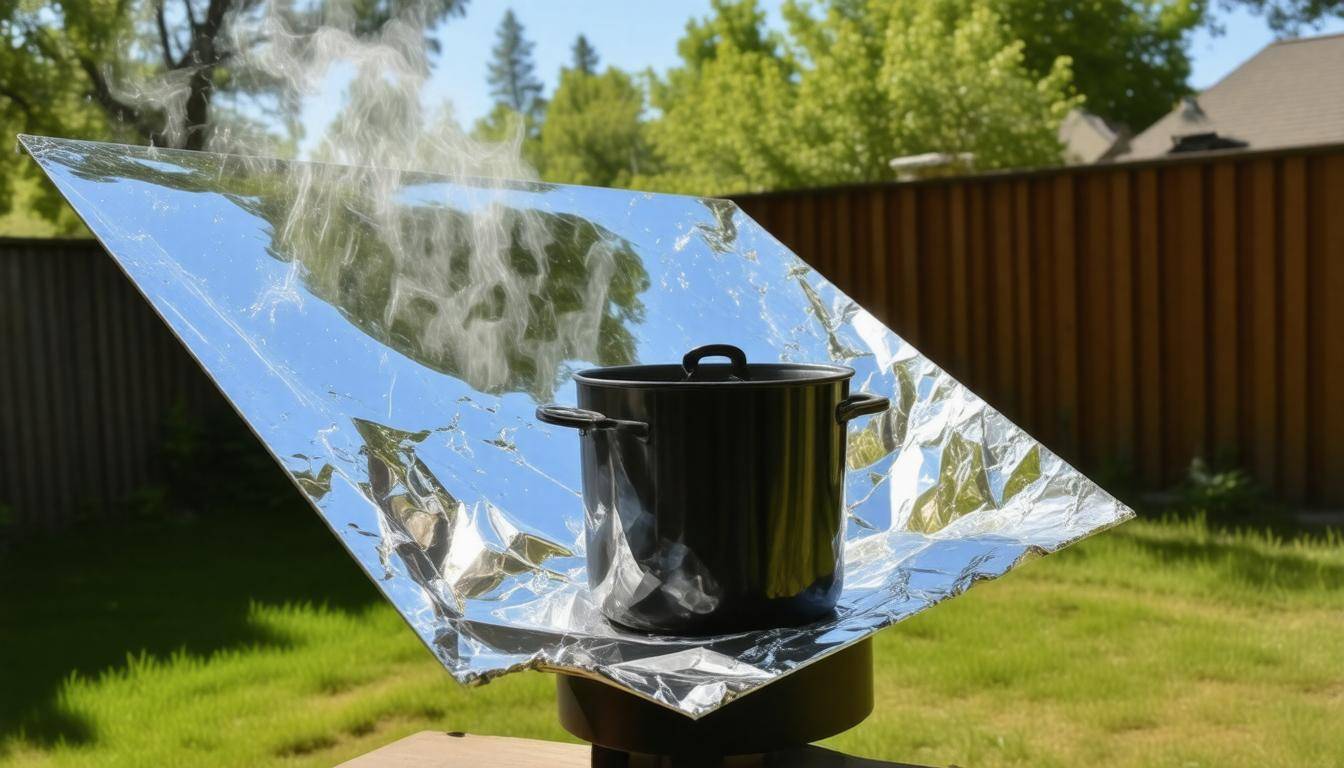
One captivating avenue is experimenting with parabolic cookers. These devices utilize reflective surfaces to focus sunlight onto a small area, producing higher temperatures in less time than traditional solar oven designs. Constructing a parabolic cooker might seem complex, but with items like satellite dishes coated with aluminum foil, it becomes quite approachable. By directing the focused beam of sunlight onto a black pot or pan placed at the focal point, you can achieve impressive heat levels capable of boiling water or cooking meals quickly.
Using these advanced devices not only tests your skills but also showcases the efficiency of solar energy in real-world applications—turning science into functionality right before your eyes. As you experiment and refine your techniques with different materials and designs, you’ll likely encounter learning moments that enhance your understanding of thermal dynamics and how to leverage natural resources effectively.
Additionally, the growing interest in sustainability means that these projects connect you with broader environmental movements aiming to reduce waste and dependency on fossil fuels. Such engaging experiences could inspire you to share your findings with friends or community members, promoting conversations about renewable energy and its significance for our planet.
By embarking on these projects, you’re not just cooking; you’re also fostering a deeper appreciation for nature’s resources and contributing to a more sustainable future.