
Fire starters can be a lifesaver when you’re trying to get a fire going—whether it’s for a cozy night at home or an adventurous camping trip. But who says you need to rely on store-bought options? Homemade fire starters are not only budget-friendly but also easy to make! In this article, we’ll explore five reliable methods using materials you likely already have around the house. Get ready to light up your fires with some clever DIY techniques that promise to ignite sparks of joy, and maybe even a campfire or two!
Five reliable methods for creating homemade fire starters include using birch bark, which ignites easily due to its natural oils; cotton balls dipped in petroleum jelly for a long-lasting burn; dryer lint as a readily available option; charcloth to produce embers when sparked; and combining paraffin wax with cotton pads to create waterproof starters. Each of these methods offers an economical and effective way to ensure you can start a fire under various conditions.
Preparing Your Homemade Fire Starters
Step-by-Step Preparation Guide
As you embark on this DIY journey, the first step is to gather your basic materials. You’ll want items such as wax—either paraffin or beeswax—as the core ingredient, but don’t overlook everyday household items: dryer lint, cotton balls, egg cartons, shredded paper, and wood shavings. Many of these materials are likely just lying around waiting for you to put them to good use, making this task both economical and sustainable.
Once you’ve assembled all the necessities, you’ll establish a small workspace to keep everything organized.
Step I – Gather Basic Materials
Now that you have your materials at hand, take a moment to prepare your workspace. Lay down some parchment paper or an old newspaper to keep your area clean. Remember, safety is paramount—ensure you have gloves handy if you’re dealing with hot wax or flammable substances. It’s also wise to keep a fire extinguisher nearby; just in case!
“A prepared workspace not only enhances focus but also makes cleanup easier later on.”
With everything organized, you’re ready to select an appropriate heat source.
Step II – Choose A Heat Source
For melting wax, you have a few options. A microwave can be efficient, especially if you’re working with small quantities. Just place the wax in a microwave-safe container and heat it in short increments, stirring occasionally. Alternatively, a double boiler method helps distribute heat evenly and minimizes the risk of overheating the wax; simply set a pot of water on medium heat and place another container atop it for a gentle melt. If you’re more traditional, using a stove can work too—just remember to stay vigilant and don’t leave it unattended as accidents can happen quickly!
With your chosen method in place and wax melting smoothly, it’s best to decide how much you want to make.
Step III – Make Small Batches
When it comes to crafting fire starters, starting with small batches is beneficial. This allows you to test different combinations without committing excessive resources upfront. Plus, experimenting will help you determine which methods yield the most effective results for your particular setup. Whether you’re using cotton balls dipped in wax or filling egg cartons with dryer lint saturated in melted wax, you’ll want to adjust ratios until you find an ideal recipe that suits your needs.
Having set the stage for creating effective fire starters, we can now turn our attention to one particularly innovative technique that can elevate your fire-starting strategy.
Dryer Lint in Egg Cartons
Utilizing dryer lint as a fire starter is not only an eco-friendly option but also taps into a clever use of household waste. When gathered from your dryer, this fluff is surprisingly combustible due to its synthetic fibers. Combining it with melted wax allows for a controlled burn that ensures your kindling gets ignited effectively.
Before jumping into the how-to instructions, it’s worth noting why this method stands out. Creating fire starters from dryer lint reduces waste while providing a reliable ignition source that can make all the difference on a brisk camping night or during a winter gathering by the fireplace.
How-To Instructions
First things first, gather your materials. You’ll need an empty cardboard egg carton and some dryer lint—plus wax if you want that enhanced burn power. After collecting your components, follow these simple steps:
Step I: Fill each compartment of the egg carton generously with dryer lint. Don’t be shy; pack it in tightly! The more you include, the better it will serve as fuel when it’s time to light your fire. Dryer lint is light and fluffy, easily catching sparks or flames, so ensuring a robust amount fills each section maximizes its effectiveness.
Now that those compartments are filled with the flammable material, it’s time to add your secret weapon for longevity—the wax.
Step II: Melt your wax using either a double boiler setup or microwave. Be cautious during this step; as you heat wax, it becomes extremely hot and can potentially ignite if not monitored properly. If you’re using a microwave, 30-second intervals should suffice—you want it just melted without bubbling.
Step III: Carefully pour the melted wax into each egg carton compartment until the lint is saturated but not swimming in excess liquid wax. This balance ensures the lint stays dry enough to catch fire while being surrounded by enough wax to extend its burning time.
Step IV: Allow everything to cool and harden completely—which won’t take long at all! Once solidified, you can simply break off an individual compartment whenever it’s time to ignite your fire. These handy little starters are portable and can be stored conveniently in your camping gear or by your fireplace for future use.
Remember, homemade fire starters made from dryer lint and egg cartons are practical representations of sustainability in our household practices and outdoor activities. By taking advantage of common materials, we enhance both our experience in nature and our environmental impact.
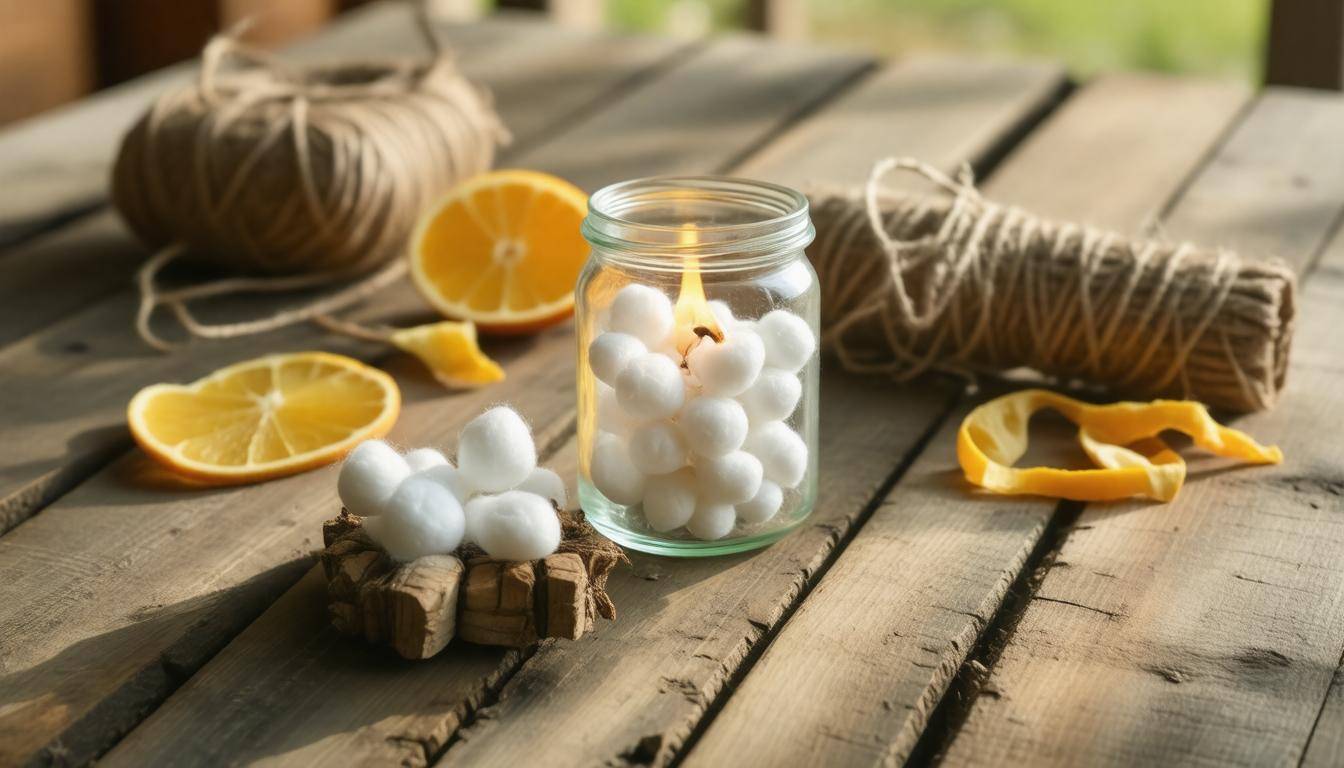
Waxed Cotton Balls

Waxed cotton balls are an exceptional option when it comes to crafting your own fire starters. Not only are they easy to make, but their compact size and efficient burn time make them a favorite among campers, bushcrafters, and anyone enjoying outdoor activities. The wax adds a layer of water resistance, allowing these little wonders to ignite easily even under less-than-ideal conditions. You might be surprised at just how effective they can be, often igniting with just a single spark.
The Method to Follow
To create these handy fire starters, gather your materials: 100% cotton balls and paraffin wax or beeswax work best for this purpose. With the right tools—a double boiler or microwave-safe container—you’re all set for this simple DIY project.
Start by placing the cotton balls in a bowl; this will allow you to have everything organized and ready for the next step. Next, melt approximately one cup of your chosen wax until it’s fully liquefied. If you’re using the microwave method, do so in intervals to avoid overheating and ensure safety.
Once the wax is melted, use tongs to dip each cotton ball into the mixture thoroughly. It’s crucial that each cotton ball is fully saturated; otherwise, they won’t achieve their maximum ignition potential later. After you’ve coated them well, place the waxed cotton balls on a baking sheet lined with parchment paper and allow them to cool for about 10-15 minutes.
Pro Tip: Store your completed waxed cotton balls in a waterproof container to ensure they stay dry and ready for action whenever you need them.
These waxed cotton balls not only burn effectively but can sustain heat long enough to ignite kindling or larger logs. Their compact nature makes them incredibly easy to pack in any camping gear or emergency kits, providing an essential resource when you might need warmth or cooking heat in unexpected situations.
Overall, these starters are a great example of resourcefulness; utilizing simple materials we’ve already got at home ensures that we always have what we need on hand without any fuss. Just imagine heading out into the wilderness with confidence, knowing you have effective fire-starting tools ready to go!
With this handy method under your belt, let’s shift our attention to another ingenious way of boosting fire-making efficiency, enhancing your outdoor experience even further.
Wood Shavings and Wax
Mixing wood shavings with wax results in a dense, long-burning fire starter that’s perfect for supporting larger fires, whether you’re preparing for a cozy evening by the fireplace or setting up an outdoor campfire. The combination is not only practical but also economical, making use of materials that may otherwise go to waste.
Think about it: those fine wood shavings that accumulate when you’re working on a project can easily transform into invaluable tools for igniting warmth and comfort.
The beauty of this method lies in its simplicity and effectiveness. Wood shavings are highly flammable, meaning they ignite easily when paired with the right type of wax. Paraffin wax or beeswax works wonderfully since both have excellent burning properties, enabling your fire starters to burn for more extended periods—typically around 10 to 15 minutes. That’s ample time to catch larger pieces of wood and sustain your fires throughout chilly evenings.
If you’re ready to dive into the step-by-step process of making these fire starters, here’s how you do it!
A Quick Guide
Start by gathering fine wood shavings; these can be collected from projects using a planer or a sander. You’ll want enough shavings to fill small paper cups tightly—typically about 1 cup per starter should suffice. Ensuring that the shavings are dry enhances their flammability, so if you happen to have any damp ones, give them time to air-dry before proceeding.
Next, melt your wax using a double boiler. This technique is essential because it allows you to control the temperature and prevent overheating, which can release harmful fumes. Once the wax melts down to a liquid state—usually between 150°F and 180°F—it’s time for the fun part! Carefully pour the melted wax over your packed wood shavings in each cup until filled to the brim, ensuring that all the shavings are saturated throughout.
After pouring the molten mixture, allow it to cool and solidify completely. Depending on your environment, this may take about 30 minutes. Once solidified, gently peel off the paper cup—your fire starter is now ready for action! Store them in a dry place for future use.
Safety Note: Always exercise caution when handling hot wax. Keep children and pets away during the melting process, ensuring proper ventilation.
These homemade fire starters yield satisfying results while promoting resourcefulness and creativity. Next, we can explore how combining shredded paper with wax enhances your fire-starting efforts by utilizing even more readily available materials.
Shredded Paper and Wax
Shredded paper holds a surprising power—a power that can transform what many would consider waste into a valuable resource for igniting fires. Imagine sitting by the fire on a cool evening, enjoying the warmth and ambiance, all thanks to something as simple as old newspapers or cardboard. This method not only taps into creativity but also promotes recycling, making it an eco-friendly choice.
Effective Method
The beauty of making fire starters from shredded paper lies in its simplicity. First, you’ll begin by shredding paper into small strips—this could be newspaper, cardboard, or even used paper towels that are no longer needed. Ideally, aim to create a volume of about two cups. It’s important to use materials that catch fire easily; the finer the shreds, the better they will ignite when it matters most.
Once you have your paper ready, it’s time to move to the next phase of this process.
In the second step, take muffin liners or any similar heat-safe molds and fill them with your shredded paper mixture. Press down gently to compact it without overstuffing; this ensures each piece is adequately packed for even saturation later on. The structure should be firm enough to hold together when you remove it from the mold but still allow space for wax penetration.
After this foundation is set, it’s time to add the magic ingredient.
Next comes the fun part: melting wax. Whether you’re using paraffin wax or old candle stubs you’ve saved up over time, melt approximately one cup of wax in a heat-safe container over low heat until it is completely liquefied. Ensure that this is done with proper ventilation because fumes may not be pleasant! Carefully pour the melted wax into each muffin liner until it saturates the shredded paper completely. This layer of wax serves two purposes—it acts as an ignition aid and creates a waterproof barrier that allows these starters to endure various weather conditions.
After pouring in the wax, patience becomes your ally.
Now, let your creations cool and harden completely—this typically takes about one to two hours. Once cooled, gently remove these fire starter discs from the muffin tin or mold. You might find them somewhat fragile initially; however, once set fully, they become surprisingly sturdy yet lightweight—perfect for transport and storage.
What makes these fire starters particularly appealing is their cost-effectiveness and environmental benefits. They utilize materials that would typically end up in the trash while providing reliable ignition sources for campfires or cozy evenings by your fireplace at home. Each starter is designed to burn for approximately eight to ten minutes, allowing ample time for kindling and larger logs to catch flame easily.
The satisfaction of lighting a fire knowing you’ve used recycled materials cleverly adds an extra layer of enjoyment to your experience.
Armed with knowledge about creating your own fire starters from everyday items, let’s now explore another option that adds flavor and character to your fires.
Chips or Wood Chips
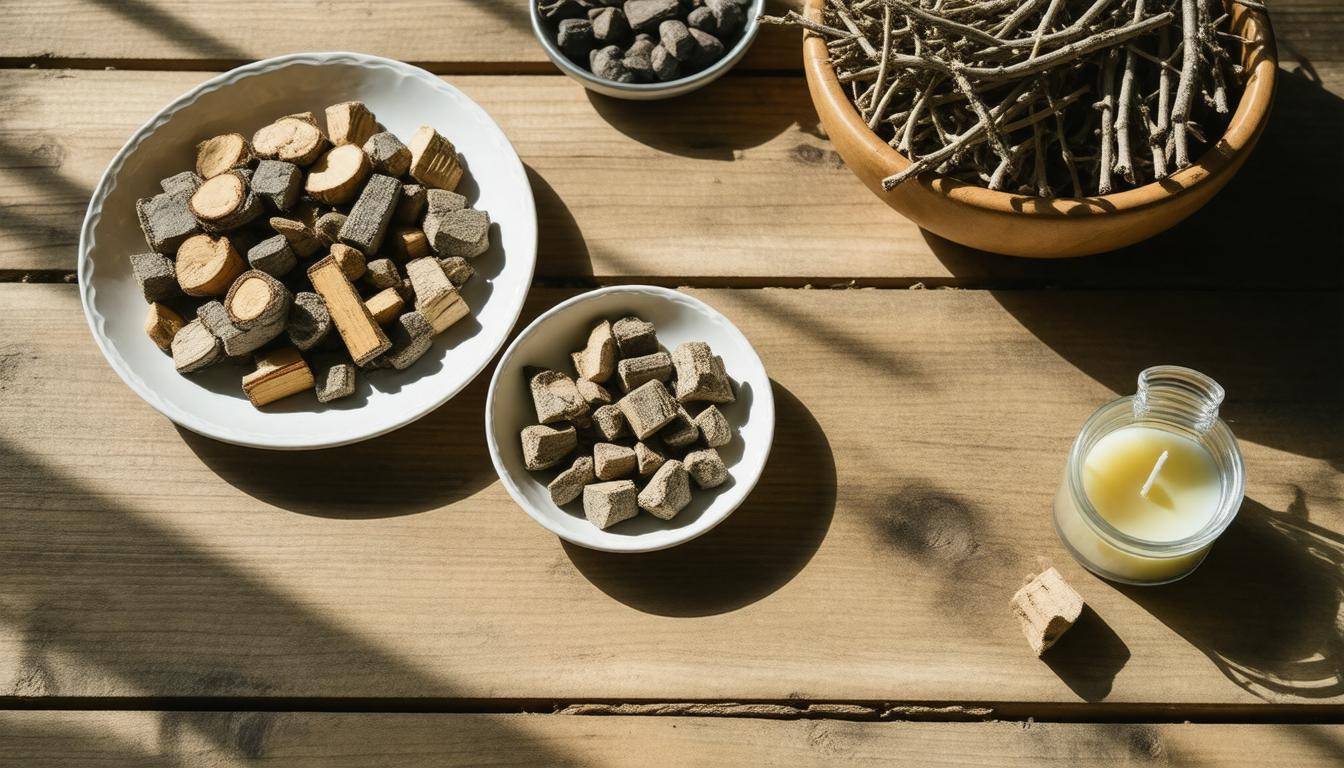
Chips or wood chips are commonly overlooked when it comes to igniting a fire, yet they offer exceptional advantages that few may realize. These natural materials not only provide the necessary sparks for starting a fire but significantly enhance the ignition process and extend burn times. The beauty of using wood chips lies in their ready availability—often found at craft stores or your local hardware store—and their ability to ignite quickly due to their size and type of wood used.
Using Chips As Fire Starters
To get started, you’ll need to gather small, dry wood chips; this is crucial since moisture can severely affect their performance. Look for hardwoods like hickory or oak, which burn longer and at higher temperatures compared to softwoods. Softer woods like pine and cedar are also effective because they ignite quickly due to their resin content.
Making your own wood chip fire starters is straightforward. Begin by spreading a layer of those small, dry wood chips in a shallow pan. Think of how you prepare the foundation of a cake; you want an even base.
After ensuring they’re evenly laid out, carefully pour melted candle wax or paraffin over the chips. This mixture serves two purposes: it bonds the chips together, making handling easier, and protects them from moisture while extending their burn time significantly. Imagine how much better your grill would work if you added fuel that kept burning longer—a similar principle applies here.
Once the wax has cooled and hardened completely, you can break the mixture into smaller chunks. These compact pieces ignite more efficiently and are easy to pack for camping trips or keep on hand at home for spontaneous fires.
This method transforms ordinary scraps into highly effective fire starters, showcasing an ingenious repurposing approach.
Finally, remember that while these wood chip starters have tremendous benefits, pairing them with other starters like birch bark or cotton balls dipped in petroleum jelly can elevate your fire-making endeavors even further. This combination improves ignition ease, particularly in challenging conditions such as damp weather. With these techniques in your toolkit, lighting a fire becomes not just simpler but also more enjoyable—an accessible way to embrace both functionality and creativity in your outdoor activities.
As we explore more options, let’s shift our focus to utilizing natural elements around us for efficient fire-starting solutions.
Using Natural Materials
For those who seek reliable, eco-friendly options for igniting a fire, using natural materials is an excellent approach. These materials not only come from the earth but also provide effective solutions for starting your flames without relying on synthetic products.
One of the standout choices is birch bark. Its natural oils serve as an incredible accelerant, allowing it to ignite even when soaked in water for extended periods. If you’re ever near a river, keep an eye out for river birch; it’s particularly noted for its easy-to-light properties and adds a lovely aroma to your fire.
Another fantastic choice is fatwood, which can often be scavenged from the stumps of pine trees. This wood contains concentrated resin and can light easily, regardless of how damp conditions may be. Just a small shard of fatwood can ignite quickly, providing an impressive flame that helps get your fire going in no time. It’s worth remembering to look for it during your outdoor adventures—this handy material is more common than you might think.
As you gather these natural elements, also consider using old man’s beard, a lichen that can be spotted hanging from tree branches. Its fibrous texture allows it to catch sparks quickly and burn brightly, making it a surprising yet effective option. Plus, it’s lightweight and transportable, perfect for when you’re out exploring.
Don’t overlook pine cones. Their resin-rich interior makes them excellent kindling and delightful additions to your fire pit aesthetic. Toss in a few dried pine cones along with your chosen fire starter; they combust easily and add volume to your flames—just ensure they are completely dry before use.
Remember though—while these alternatives are captivatingly effective, don’t be too eager. You wouldn’t want to start a bonfire in your living room because you couldn’t resist the allure of nature’s treasures!
Utilizing these natural materials effectively allows you to enjoy the warmth of a crackling fire while embracing sustainability through resources straight from nature itself. As we continue exploring this topic, let’s examine how artificial components can enhance your fire-starting methods.
Adding Artificial Components
One innovative approach to making your fire starters more effective involves incorporating artificial components such as match heads. This addition boosts your chances of ignition and transforms your homemade fire starters into powerful tools that spark fires quickly and sustain them for longer durations. The trick lies in the chemistry of combustion, where integrating these elements can lead to an explosive start—even when conditions aren’t ideal.
Techniques to Enhance Fire Starters
To begin, gather your materials. Match heads, known for their flammability, act as ignition accelerators in your concoction. Start by breaking the match heads into small pieces; this ensures even distribution throughout your fire starter mixture. Next, combine these tiny bits with cotton balls, wood shavings, or dryer lint—the fluffier the material, the better it catches a spark.
It’s important to remember that with great power comes great responsibility: always handle match heads carefully, as they are sensitive to impact.
After combining your match head bits with the preferred fibrous material, here’s where the magic happens: pour a mixture of paraffin wax over everything to bind it together and add waterproofing. Once you’re done, let the wax cool and solidify. You’ll end up with a compact fire starter ready to tackle harsh weather and stubborn tinder.
Consider these match heads as “boosters” for your fire starters. When tested against regular cotton balls or lint alone, you’ll notice a marked improvement in both ignition speed and burn time—often lasting over ten minutes even under less favorable circumstances.
By understanding these techniques and embracing this creative flair, you can craft reliable fire starters that ensure you’re always prepared for any camping adventure or cozy evening by the hearth.
In creating these homemade fire starters, not only are you ensuring quick ignitions but also maximizing burn time—an essential feature for anyone who enjoys outdoor activities or simply wants a reliable way to ignite their fireplace.