
Planning a trip to the mountains is exciting, but it can also feel pretty overwhelming. Imagine you’re standing at the foot of a towering peak, gear in hand, ready to explore the beauty surrounding you—but how ready are you for the unexpected? The reality is that mountain adventures can quickly shift from fun to stressful if you’re not prepared. That’s why having an emergency kit packed with essential supplies is crucial. This guide will help you put together a well-thought-out emergency kit that covers medical needs, safety tools, and everything else needed to ensure you’re ready for any situation during your outdoor experience. It’s smart to be prepared, so you can enjoy your adventure and stay safe all at once!
The Complete Guide to Mountain Environment Emergency Kits details the key components, safety features, and recommended supplies necessary for outdoor emergencies in mountainous environments. This guide emphasizes the importance of advanced medical tools, color-coded supply organization, and critical emergency supplies tailored for groups embarking on outdoor adventures, ensuring optimal preparedness for any situation that may arise.
Essential Mountain Survival Gear
Surviving in a mountain environment demands not just any gear but specialized equipment designed to withstand harsh conditions while maximizing safety. One fundamental item is a multipurpose survival tool, like a Swiss army knife. This versatile gadget combines several functions into one compact form, allowing you to cut ropes, open cans, or perform basic first aid tasks. Selecting one with high-quality materials, such as stainless steel, ensures durability when you need it most.
Alongside this vital multi-tool, another critical item is paracord.
Paracord is lightweight yet incredibly strong and can be a literal lifesaver in emergency situations. With its many uses—from building shelters to repairing gear or assisting in climbing—having paracord on hand is essential for any outdoor enthusiast. When selecting paracord, look for a high-quality braid with a minimum tensile strength of 550 pounds, ensuring that it can support a heavy load without snapping easily.
As you start assembling your kit, don’t forget about fire-starting tools.
A compact, waterproof fire-starting kit is indispensable; it should include matches, lighters, and fire sticks to help ignite flames even under wet conditions. Fire not only provides warmth but also serves many purposes such as cooking food and signaling for help in an emergency situation. Consider including magnesium fire starters or flint and steel tools, which can perform well even in adverse weather.
While these core items form the foundation of your survival kit, protection against the elements becomes increasingly important as conditions worsen.
Shelter and Warmth
An emergency bivy sack or a compact tent should be viewed as non-negotiable elements of your kit. These shelters are specifically designed to protect you from harsh weather and unwelcome winds without weighing you down during your hike. Look for options that are lightweight and water-resistant; ideally, they should also retain body heat effectively without compromising portability.
Moreover, space blankets are often overlooked but are surprisingly effective at conserving body heat due to their reflective material. They are ultra-compact and can be easily stowed away until needed, providing crucial warmth when temperatures plummet unexpectedly. Always remember that being prepared in the mountains isn’t just about having gear; it’s about having the right gear that will cater to unpredictable weather conditions.
Equipping yourself with these carefully chosen survival essentials sets the stage for understanding how to carry them efficiently into the wilderness. Next, we’ll explore what makes an excellent backpack for storing all this vital gear.
Ideal Backpack for Adventures
Your backpack will be your lifeline while exploring the great outdoors. It’s about more than just carrying your essentials; it’s about choosing one that seamlessly fits into your adventure. This way, you can focus on enjoying nature rather than worrying about discomfort or disorganization.
Consider a backpack with a capacity between 50L and 70L, which provides ample space for your gear without becoming unwieldy to carry. Brands such as Osprey and Deuter are renowned for their adjustable harness systems. These allow you to tailor the fit according to your body shape and size, offering support while accommodating movement. This is crucial during long hikes where comfort directly affects your stamina and enjoyment.
Once you’ve got sizing down, it’s time to assess the materials used in constructing your backpack, which play an equally crucial role in durability and performance.
Size and Fit
It’s important to remember that not every backpack fits everyone perfectly; finding the right fit is vital. You want to feel supported but also have enough room to move freely. A well-fitted backpack should distribute weight evenly across your shoulders and hips, helping to mitigate fatigue during long treks. Flexibility matters—look for features like adjustable straps or hip belts that can adapt to your posture whether you’re climbing a steep incline or traversing rugged terrain.
Material and Durability
Now let’s talk about what your backpack is made of. Opt for durable, water-resistant materials like high-denier nylon or ripstop fabric, which are essential when you encounter rain or unexpected splashes from streams. Reinforced stitching and robust zippers add to the longevity of your backpack and ensure it withstands adventurous tumbles that come with outdoor activities. A good rule of thumb is: if it looks like it could survive a fall out of a tree, it’s probably a solid choice!
Compartmentalization can significantly enhance organization within your gear. Look for models equipped with multiple compartments—this way, you’ll avoid digging through layers of gear to find that elusive snack bar or first aid kit (we’ve all been there). Dedicated pockets for hydration reservoirs help streamline access to your supplies without sacrificing space or balance. However, while extra pockets are great, be cautious of bulky designs that complicate movement; a streamlined pack that holds your essentials closer to your body is preferable over one loaded with unnecessary exterior attachments.
Investing time in selecting an appropriate backpack tailored to your adventure requirements enhances both comfort and functionality amid unpredictable challenges in the mountains.
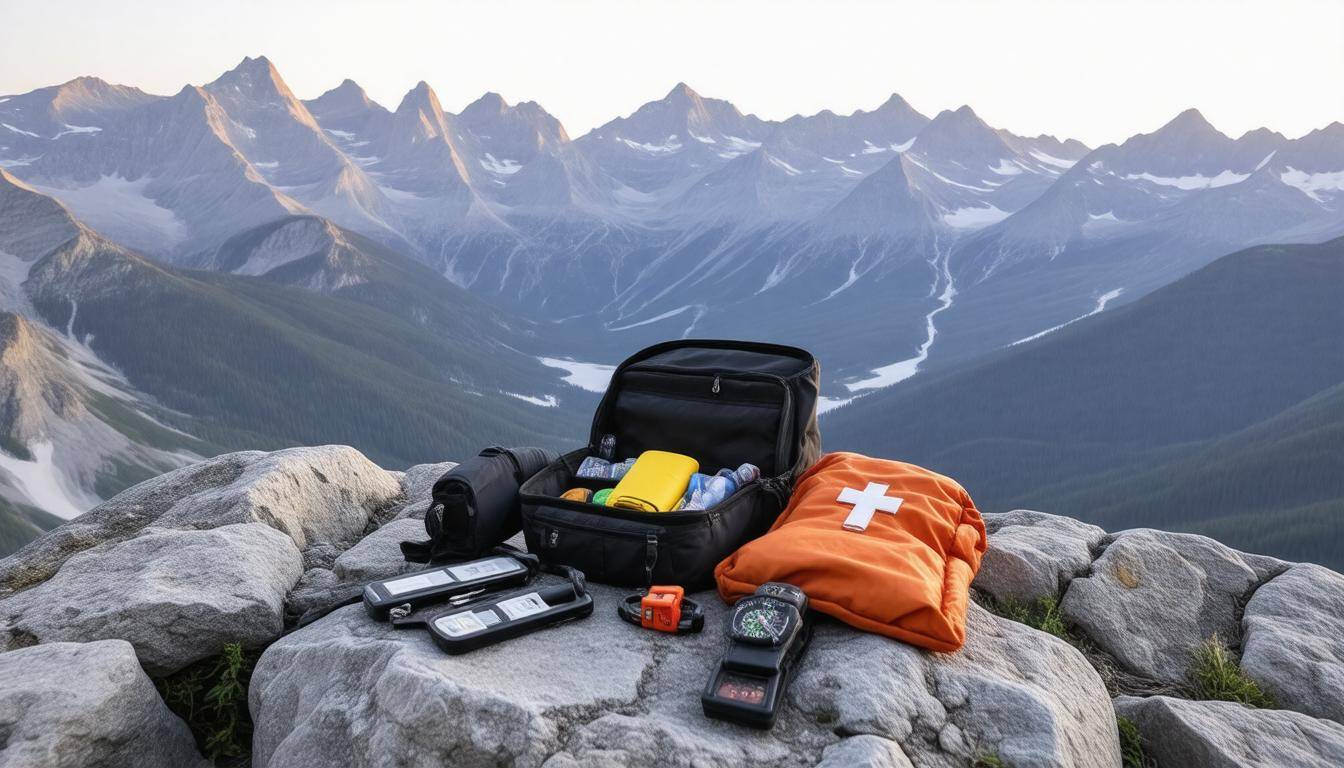
Key Safety and Emergency Items
Safety is paramount in mountainous environments, which is why your emergency kit must be comprehensive and well-thought-out. When venturing into the wild, you’re not just carrying gear; you’re holding onto your lifeline. A well-equipped kit provides peace of mind and can significantly enhance your chances of survival in unexpected situations. To start with, let’s consider the essential components you should prioritize.
First Aid Kit Components
Key components include:
-
Adhesive bandages: These come in various sizes to cover everything from minor cuts to larger abrasions. Always pack a mix!
-
Sterile gauze pads: They are crucial for more serious injuries, helping to control bleeding.
-
Antiseptic wipes and ointment: Vital for preventing infections and ensuring any wound stays clean.
-
Tweezers and a small pair of scissors: Tweezers are perfect for removing splinters or ticks, while scissors can help cut tape or gauze quickly.
-
Pain relievers, antihistamines, and other essential medications: Be sure to have common medications for headaches, allergies, or any personal prescriptions.
Beyond first aid supplies, your kit should include devices specifically designed for signaling in emergencies.
Emergency Signaling Devices
In the event of an emergency, being able to communicate or attract attention can be life-saving. A whistle is one of the simplest yet most effective tools—its sound carries far and doesn’t require batteries. Pair it with a signal mirror that reflects sunlight to catch the eye of rescuers from afar. Furthermore, a small LED flashlight with extra batteries ensures that you’re never left in the dark; illuminating paths or signaling for help becomes much easier.
It’s also wise to carry a compact two-way radio equipped with backup batteries. This device allows you to stay connected with your group or reach out for help if you lose cell service—an all too common issue in remote areas. The ability to communicate effectively can not only improve the group’s safety but potentially increase the odds of being rescued quickly.
Preparing these elements isn’t simply about packing items into a bag; it requires thoughtful consideration of your environment and potential risks associated with your adventure. Each component plays a role in not only keeping you safe but also providing tools that can assist in emergencies. Having an organized and easily accessible emergency kit could mean the difference between a challenging day outdoors and a true survival situation.
As we continue our discussion on essential preparations for mountain excursions, it’s important to consider the significance of provisions that support health and endurance during extended trips away from civilization.
Protective Clothing for Extreme Altitudes
Understanding the purpose and function of each layer in your clothing is paramount to your success in the mountains. When venturing into harsh environments, every layer serves a specific role, acting like armor against nature’s challenges. The base layer is your first line of defense; its moisture-wicking capabilities are crucial. Think about this: when you’re sweating, that moisture can chill you to the bone as temperatures drop, especially at higher altitudes. Fabrics like merino wool or advanced synthetic options efficiently draw sweat away from your skin and allow it to evaporate quickly.
However, staying dry is just one piece of the puzzle.
Next comes the insulation layer. This is where you actually hold onto your body heat. Lightweight down jackets or high-quality fleece materials can trap warmth without weighing you down. You don’t want to feel bogged down while navigating rocky terrain or steep inclines! Look for insulation that compresses easily so that it doesn’t take up much space in your pack when you need to shed a layer.
A good tip is to choose a jacket with baffle construction, which allows for better heat retention by preventing the fill from shifting and creating cold spots.
Finally, we arrive at the outer layer, which is your shield against wind, rain, and snow.
A waterproof and windproof shell jacket should be made from breathable materials; otherwise, you’ll end up feeling clammy due to trapped moisture from sweat. Think of it like putting on a raincoat—you want it to keep you dry but not turn you into a steaming sauna! It’s also essential for this layer to fit well; loose fabric can get in the way of movement or make it difficult to put on other gear.
- Ventilation Options: Look for jackets with underarm zippers or mesh-lined pockets that can help release excess heat when you’re working hard.
- Adjustability Features: Hoods should ideally be adjustable so they can remain snug during gusty winds, and cuffs should close tightly around your wrists to keep warmth trapped inside.
As you combine these layers based on activity levels and weather conditions, remember that each plays an integral role in helping maintain optimal body temperature. Investing time into thoughtful layering ensures not only your comfort but also your safety when tackling unpredictable mountain environments.
With a solid understanding of protective clothing established, let’s move forward to explore how navigational tools and route planning can further enhance your outdoor experience.
Navigational Tools and Route Planning
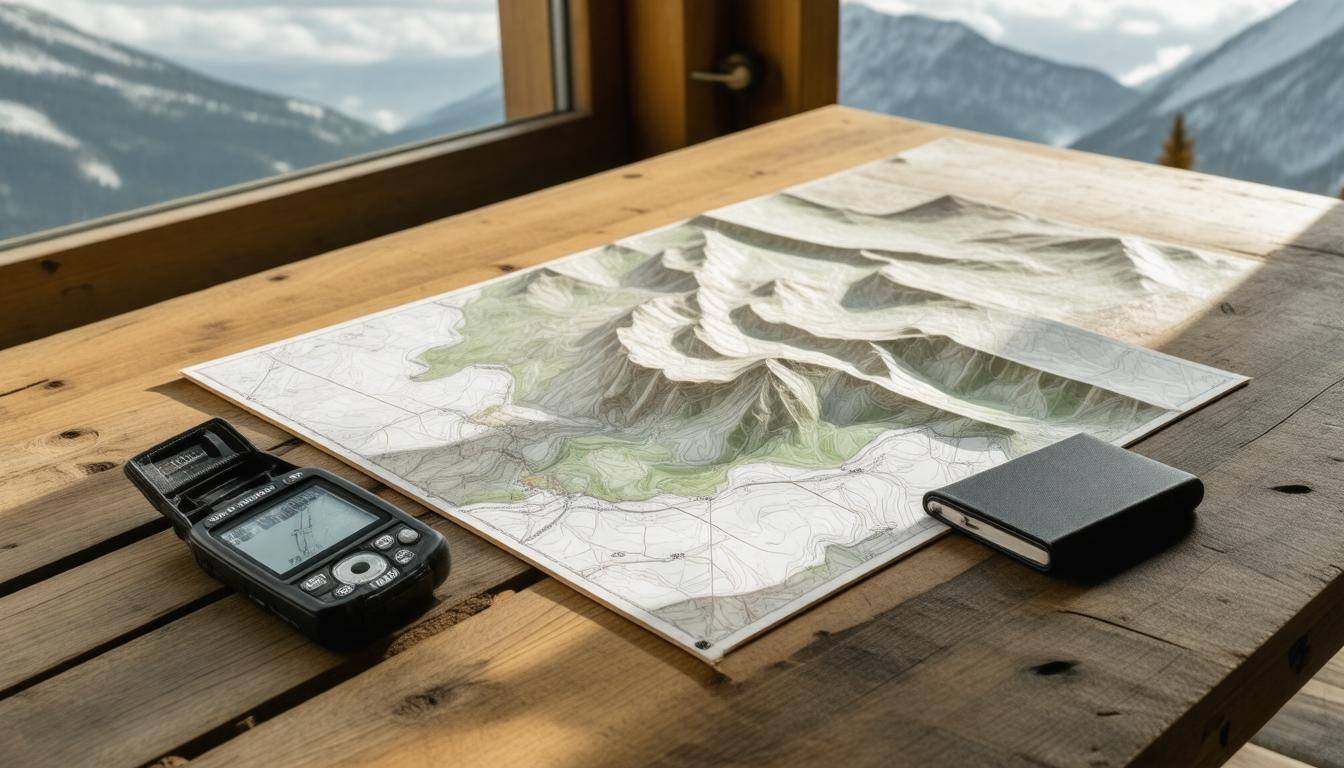
Reliable navigation tools are essential for any adventure in the mountains. Even experienced adventurers can find themselves disoriented, especially in changing weather or unfamiliar terrains, making these tools not just helpful, but lifesaving. The basics begin with topographic maps and a compass. These foundational tools help you visualize the landscape, revealing the highs and lows of the terrain ahead. However, familiarity with how to read these maps is crucial—understanding contour lines can guide you in planning your routes safely.
A topographical map shows elevation changes that GPS devices simply cannot convey, which is invaluable when choosing paths through hilly or mountainous areas.
While technology has brought incredible advances, reliance on it alone can lead to overconfidence.
Enter the GPS device or a smartphone equipped with offline maps. These tools are superb for pinpointing your location, providing route assistance, and even identifying points of interest along your journey. However, it’s vital to remember they should never fully replace traditional navigation skills. Imagine that moment when your battery dies or you find yourself outside network coverage—your printed map and compass suddenly become your best friends again.
Essential Navigational Tools
Alongside the gear mentioned, bringing an altitude meter is also beneficial when traveling through mountainous areas. It allows you to gauge your elevation gain accurately and helps in cross-referencing with your topographical map.
The best navigators blend both techniques: digital precision meets old-school know-how.
- Topographic Map: Always ensure it is updated.
- Compass: Make sure you know how to use it both for general orientation and fine-tuning your position.
- GPS Device/Smartphone: Download maps for offline use before heading out.
- Altitude Meter: Keep track of elevation as you maneuver through rugged landscapes.
Once you have all the tools ready in hand, the next step is route planning.
Route Planning
Before embarking on any outing, meticulous route planning can make a world of difference in ensuring safety and enjoyment. Begin with studying the area’s topography, paying special attention to elevations and potential obstacles. Identifying challenging segments not only prepares you mentally but allows you to devise alternative paths if necessary.
- Make a note of potential water sources along your route; hydration is vital in mountain environments.
- Identify possible camping spots for multi-day trips based on terrain features and safety from harsh winds.
- Always check recent trail reports to stay informed about hazards such as rockslides or downed trees that could impact your path.
Proper preparation is not only about knowing your route but also about being ready for unexpected changes. Flexibility in adapting your plan when confronted with unforeseen challenges is key to a successful mountain adventure.
By creating a solid plan backed by the right navigational tools, you position yourself for safer journeys while embracing the excitement that comes with exploration. As you prepare for your trip, being aware of health issues that can arise at higher altitudes becomes critical in ensuring an enjoyable experience in the great outdoors.
Treating Altitude Sickness and Injuries
Altitude sickness, often referred to as Acute Mountain Sickness (AMS), is a reality that many travelers face once they ascend above 8,000 feet. Knowing how to combat its symptoms not only eases discomfort but can also prevent the escalation of more severe issues, such as High Altitude Pulmonary Edema (HAPE) or High Altitude Cerebral Edema (HACE).
Typically, initial symptoms feel similar to those of a nasty hangover: headaches, dizziness, nausea, and overwhelming fatigue. It’s crucial to recognize these signs promptly since ignoring them can lead to serious repercussions.
Recognizing Symptoms
Being aware of the symptoms can be your first line of defense against altitude sickness. If you find yourself experiencing headache, nausea, dizziness, or unusual fatigue during your climb, it’s time to act. These symptoms can escalate into life-threatening complications like HAPE or HACE.
For example, HAPE can cause fluid build-up in your lungs, making it hard to breathe and potentially leading to death if not treated immediately. Always listen to your body’s signals in high-altitude environments.
Treatment Steps
So what do you do once you start feeling unwell? Here are some steps based on advice from experts and seasoned climbers:
-
Descend Immediately: The most important step you can take is to get to a lower altitude as quickly as possible. Even descending just a few hundred feet can make a world of difference in alleviating AMS symptoms. Consider this: when your cabin pressure changes too quickly on an airplane, oxygen levels reduce; this scenario plays out similarly at altitudes where oxygen is thin.
-
Hydrate and Rest: Once you’ve given up height for health, focus on hydration. Drinking enough fluids is essential because dehydration exacerbates altitude sickness symptoms. Aim for water or electrolyte-rich drinks; avoid alcohol and caffeine—they’ll only dehydrate you further. Rest your body; lay back in a safe spot and allow time for recovery.
-
Medications: If symptoms persist despite taking necessary precautions, consider carrying medications in your emergency kit. Acetazolamide is effective in helping speed up acclimatization while managing AMS symptoms. It’s often referred to as a prophylactic treatment against altitude illnesses. For headaches or aches from physical exertion, over-the-counter pain relievers—like ibuprofen—can work wonders.
Just as understanding altitude sickness management is vital, being equipped to treat injuries during your outdoor adventures is equally crucial for maintaining safety and wellbeing.
Food and Water Essentials
Sustenance is critical for maintaining energy levels, especially in strenuous conditions. When you’re navigating tough terrain or pushing through altitude changes, having the right food and water can make all the difference between fatigue and vitality.
High-Energy Food Options
When packing your emergency kit, consider these high-energy food options:
-
Energy bars and gels: These provide a quick boost and are easy to carry, making them ideal for on-the-go energy. They’re designed specifically for athletes and hikers, providing carbohydrates and sometimes even protein.
-
Dehydrated meals: Lightweight and convenient, these meals require only hot water to prepare. Brands like Mountain House offer options that can bring comfort after a long day of hiking.
-
Trail mix and nuts: This classic snack not only offers sustained energy but also contains healthy fats and proteins. Customizing your trail mix with dried fruits or dark chocolate can add extra calories and keep your taste buds happy.
With food sorted, let’s turn our attention to the equally important aspect of hydration.
Water Purification
It’s vital to stay hydrated, especially when you’re active outdoors. Carrying a portable water filter or purification tablets ensures you have access to clean water wherever you are. A collapsible water bottle is particularly handy in saving space in your pack while adding flexibility for hydration needs. For added safety, consider a UV purification pen; this device can render harmful microorganisms harmless in mere minutes.
| Item | Quantity | Weight |
|---|---|---|
| Energy Bars | 10 | 1 lb |
| Dehydrated Meals | 5 | 2 lbs |
| Trail Mix | 1 lb | 1 lb |
| Water Filter | 1 | 0.5 lbs |
| Purification Tablets | 1 pack | 0.1 lbs |
By planning for both nutritional needs and hydration strategies, you lay the groundwork for a successful outing in the mountains, ensuring you remain energized and refreshed as you continue on your journey.
Packing Your Emergency Kit
When it comes to packing your emergency kit, a thoughtful approach can make all the difference between a smooth experience and one fraught with hassle. The first essential step is to prioritize accessibility. Imagine you’re in a situation where every second counts—having your first aid kit, water, and snacks easily reachable can save precious time. Place these items at the top of your pack or in external pockets so they are right at hand when needed.
Step-by-Step Packing Guide
Following that initial sorting of essentials, it’s crucial to distribute weight evenly across your backpack. Heavy items should be positioned close to your back; this centralizes the load and helps prevent strain on your body. Think of it like balancing a seesaw: if one side is weighed down too much, it will tilt, leading to discomfort and difficulty maneuvering. Maintaining an even weight distribution keeps you agile and stable on uneven terrain.
Many seasoned hikers recommend testing your packed kit before a trip by wearing it around your home or neighborhood; this gives you insight into how your body handles the weight and allows you to adjust as needed.
Another effective strategy involves using compression sacks. These handy tools help minimize space occupied by clothing and sleeping bags, essentially pressing out excess air and making them more compact. Picture cramming a suitcase before a flight—it’s often about squeezing in every last bit while maintaining an organization system. By employing compression sacks, you’re maximizing space efficiently without sacrificing access or comfort.
As you finalize the packing process, remember that proper organization means being prepared for uncertain situations with ease. However, it’s equally vital to periodically review and adjust your kit based on past experiences and the destinations you’re heading towards.
What worked for last year’s summer hiking adventure may not apply when tackling winter conditions. Items might become worn out or outdated, so as your skills evolve, so too should the contents of your kit. Make it a habit to examine everything carefully each season—consider what food supplies need replenishing, whether gear still functions correctly, and if there’s something new you might benefit from during your next expedition.
In essence, efficient packing with continuous evaluation ensures safety and fosters confidence as you tread through beautiful yet unpredictable mountain landscapes. Ultimately, being well-prepared can mean the difference between a memorable adventure and an unexpected crisis.